Monday 26 October 2020

Beautiful Autumn Suite - two colourways

Beautiful Autumn Gilded Stampin Up

I’ve just spent a week in the beautiful Lake District, where the autumn colours were rich and stunning. I do love this time of year, which is why I was so drawn to the Gilded Autumn Suite.

This card was inspired by one created by a Stampin’ Up!® designer. It uses the same sketch and the same Beautiful Autumn bundle, but I’ve changed the colours to use the Gilded Autumn Designer Series Paper.

Beautiful Autumn Gilded Stampin Up

I have adapted the project to suit the products I have, so have used the Story Label Punch for my main greeting and yes, even for those semi-circular elements.  


Beautiful Autumn Stampin Up card sketch

Beautiful Autumn Stampin Up
Punches can be trimmed, punched again and more. I have create the illusion of semi-circular elements using the same punch as I used for the greeting, simply by trimming off the ends and only allowing the curve to show. You get two from each punch, too.

Beautiful Autumn Gilded Stampin Up

The card is finished off with some Basket Weave ribbon in Mint Macaron, Linen Thread and some Gilded Gems for a touch of bling.

Beautiful Autumn Stampin Up

In contrast, the Stampin’ Up!® designer went for a much more vibrant colour scheme for this project, using the Flowers for Every Season Designer Series Paper and Bumblebee Ribbon. The project uses four of the five 2020-2022 in Colors and has a much more flamboyant feel. It just shows how you can get very different looks from the same stamp set, simply by changing the colour scheme.

Take a look at some more ideas from Stampin’ Up!® designers...

This fun project is a decorated Round Tin, and uses the Stitched So Sweetlydies and Subtles Designer Series Paper Pack.
Beautiful Autumn Stampin Up

These cards are easy to make in any colours. For instructions and metric measurements using A4 cardstock, please download the PDF from my website here.


Friday 23 October 2020

Create beautiful sponged skies for In The Pines

In The Pines Northern Lights Stampin Up

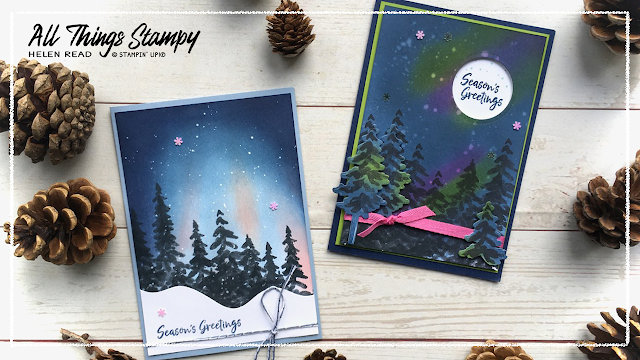
I do love a sponging technique. And these cards take sponging to the max, with one of my favourites: the Northern Lights technique.

I’ve never been lucky enough to see the Northern Lights (although to be honest that’s no surprise as I’ve never gone out of my way to find them) but I really do enjoy creating the effect on a card.

And all you need are a few ink pads and some sponges.

In The Pines Northern Lights Stampin Up
 
I demoed this card and the In The Pines Bundle at a Stampin’ Up!® party recently (online, via Zoom, of course). It’s a lovely atmospheric effect which uses Blushing Bride, Seaside Spray, Misty Moonlight and Night of Navy ink pads.

In The Pines Northern Lights Stampin Up
The key with sponging, as I keep telling my customers, is to keep going. So many people give up too soon and are dissatisfied with the results. It will look horrible partway through, so plough on until you reach full colour saturation.

In The Pines Northern Lights Stampin Up
 
For this card, I dragged some Blushing Bride ink up from the bottom of the image, not worrying too much about blotches at the bottom as I knew I would be covering them with the trees. Then I blended in some Seaside Spray around them and across the whole of the centre of the card.

Working from the edges, I added some Misty Moonlight in an arc. Then finally, working from the top two corners, I added some depth with Night of Navy.
 
In The Pines Northern Lights Stampin Up

The trees are from the In The Pines stamp set but you may notice they are tall and thin. This is really easy to recreate. I just used the “background” stamps, not the detailed images, and stamped in Memento Tuxedo Black. I stamped the big trees then took the small slim tree and stamped on top to extend the trunk. Very simple and very effective.

To add the stars in the sky, I simply took some Craft Whisper White ink, diluted with water (1:1 ratio) and splattered this over the card using a fine paintbrush. I keep this diluted ink in an old embellishment pot so I can use it over and over again. A very little goes a LONG way!
 
In The Pines Northern Lights Stampin Up

The second card is a fine example of what you can make with those practice sheets, the bits that go “wrong” and a lesson in adaptability.

I had some earlier Northern Lights sheets which I hadn’t loved. In fact, I’d sponged the top, not loved it, turned it round and sponged the other end until I had a full sheet. Neither was quite what I was after so I played around and stamped black trees on top. Another practice sheet was used for more trees, which I die-cut using the Pine Woods Dies and popped up. Finally I felt I was getting somewhere, but REALLY wished I’d masked off a white moon. 
 
In The Pines Northern Lights Stampin Up

No problem! I simply die-cut a circle to represent the moon, and stamped my greeting inside. I did this by inking the one word of the greeting stamp at a time, using a Night of Navy Stampin’ Write Marker and cleaning thoroughly in between. 
 
It’s finished off with a slightly different splattering technique; this time I just used plain water, which soaks up some ink and leaves a more subtle snowy look in the sky. Finally, some Magenta Madness ribbon picks up the pink in the sky. 

In The Pines Northern Lights Stampin Up


In The Pines Northern Lights Stampin Up

Do you have trouble fitting your dies back into the pack? I nearly always do so was inspired to create a printed backing sheet, just like the one which comes with the Playful Alphabet dies. All I did was leave the dies in place and draw round them with a Journalling Pen. Now I not only don’t have to fiddle around to fit all the dies in, but I can see at a glance if one is missing. 


Monday 19 October 2020

Sponged trees with the Evergreen Forest 3D Embossing Folder

Evergreen Forest Embossing Folder Stampin Up

This Evergreen Forest 3D Embossing Folder delivers SO much more than it seems to at first glance. Yes, it looks great when used on green cardstock, and super-classy when used on crisp white cardstock but stop! Why not have a bit of fun with it?

I saw these beautiful designs by Barry and Jay at Mitosu Crafts and couldn’t resist having a go myself. It’s just a simple case of embossing then sponging on some colour. 

Evergreen Forest Embossing Folder Stampin Up

For the blue card, I used Seaside Spray, Misty Moonlight and just a hint of Night of Navy in the corners.

Evergreen Forest Embossing Folder Stampin Up

For the purple version, I used Highland Heather, Gorgeous Grape and just a hint of Blackberry Bliss in the corners and at the base. 

Evergreen Forest Embossing Folder Stampin Up

Next I took some diluted Whisper White Craft Ink (about 1:1) and, using a small paintbrush, spattered it across the sponged sections. And they’re finished off with some Adhesive-Backed Snowflakes which I absolutely adore.

Evergreen Forest Embossing Folder Stampin Up 
For the base of the cards, I used the Pine Woods Dies, which I LOVE, obviously, and I have two great tips for these dies, in case you decide to add them to your stash (which I highly recommend, obviously). 

Evergreen Forest Embossing Folder Stampin Up

The Foam Adhesive Sheets are ideal when die-cutting this tree. It may feel a bit fiddly to press out but that’s because the die may not have gone all the way through to the backing sheet, but if you peel the tree out carefully it will be perfectly fine. And it looks so much more professional without all those fiddly little bits of cut-up Stampin’ Dimensional on the back.

Pine Woods Dies Stampin Up tip

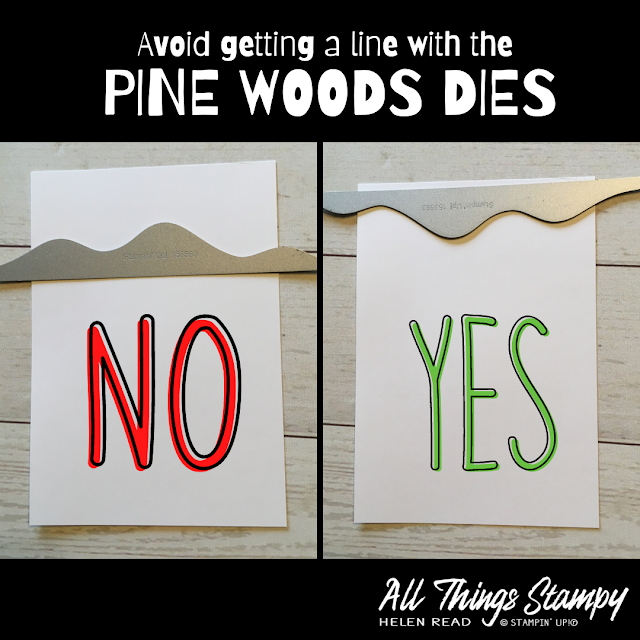
When I was cutting the snowy hill using these dies, I kept getting an unsightly embossed line where the edge of the die had been. Then I had a light-bulb moment and realised I was using them upside-down. Use them as I have done in the pic on the right, and the embossed line will be on the piece you discard (unless you wish to trim it off and have a smaller hill for another project).

So what do you think? Are you going to have a go at sponging this gorgeous embossing folder? Which colours do you prefer?


Thursday 15 October 2020

Trimming the Town international blog hop

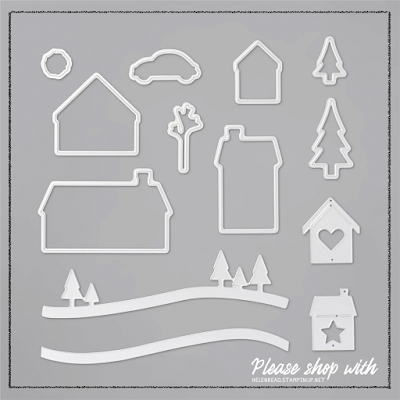
Trimming the Town Home Together Dies Stampin Up

It’s another exciting day in the world of Stampin’ Up!® crafting as we have another international blog hop for you so a warm welcome to everyone, particularly those who are here for the first time.  
 
Trimming the Town Home Together Dies Stampin Up

This time we are showcasing the Trimming the Town Suite, which is a fabulous suite in the August-December Mini Catalogue.

It’s a very special suite as the stamp set, Coming Home, as well as the Coming Home Bundle, raises money for adoption and fostering charities. I have this gorgeous set and have used it in this blog post here.  

And the Designer Series Paper, which I haven’t used today but made great use of in these projects, is currently available at 15% off until the end of October, so make sure you don’t miss that!

In fact, I have the whole Suite (that happens more and more lately!) but today I particularly want to concentrate on the beautiful Home Together Dies because I have been using these recently in my events. 
 
All my events are currently held on Zoom, which is the closest we can safely get to a real craft class right now, and I like to offer a variety of events to suit all budgets, which often means creating projects based on dies, which I can cut in advance. For my October Crafty Friday event, where we enjoy playing with techniques, we made two cards:
 
Trimming the Town Home Together Dies Stampin Up

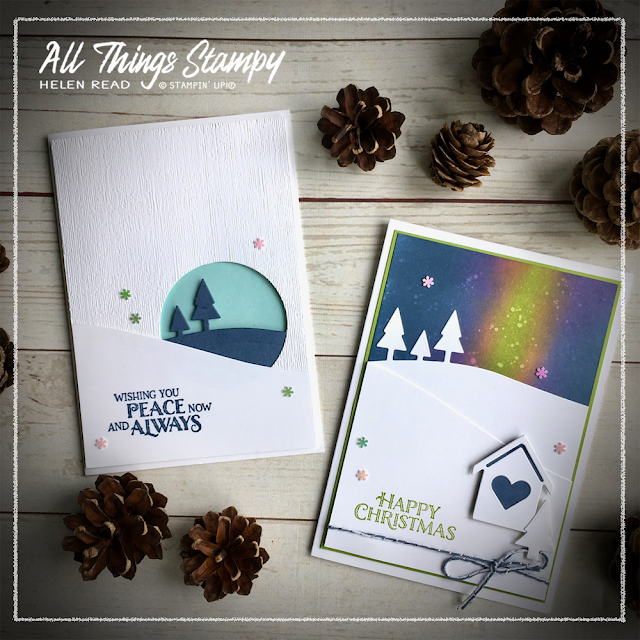
We eased ourselves in gently with this clean and simple white card, which draws the eye into a pair of trees on a hill. 
 
Trimming the Town Home Together Dies Stampin Up

The layer with the circle is also embossed using the Subtle 3D Embossing Folder, which is one of my favourites. I also know that many of the ladies attending had that folder, and those who didn’t could use something equally neutral.
 
Trimming the Town Home Together Dies Stampin Up
When die-cutting and embossing the same piece, make sure you do the die-cutting first. Otherwise, the cutting process will squash your lovely embossing.

I stamped this lovely sentiment from Yuletide Pasture in Misty Moonlight. I love how Misty Moonlight goes so beautifully with one of my favourite colours, Pool Party.

The card is finished off with these gorgeous Adhesive-Backed Snowflakes which I discovered recently. I actually bought them for a November class but couldn’t resist opening them early and have since had to re-order. Honestly, just buy them; they’re so delicate and subtle. 
 
Trimming the Town Home Together Dies Stampin Up

The ladies asked me why we’d started with the simpler card instead of this Northern Lights card which followed. The answer was because the Northern Lights card is sponged and I really didn’t want inky fingers on a such a clean, white project!

I love the Northern Lights technique. It’s one of those which turns out different every time, so it’s not for those among you who like order and predictability in their crafting!

You begin by sponging a couple of stripes, diagonals or smudges on your Whisper White cardstock using a bright colour or two. I’ve used Granny Apple Green and Magenta Madness. Make sure you fully blend them into each other as you don’t want to see any white cardstock through. 
 
Trimming the Town Home Together Dies Stampin Up
 
Next sponge around them using a dark blue ink – I used Misty Moonlight. And again, make sure you blend in well to the bright colours so you don’t get any gaps. You’re aiming for full colour saturation here, so don’t worry if you go over some of the pink/green.

Trimming the Town Home Together Dies Stampin Up
If in doubt, just keep going. If you’re not happy with the results (and everyone reaches this stage in the Northern Lights project), just plough on and add more ink. It will work out in the end, trust me.

To add a wintry feel to the sky, we then splashed it with clear water. This is another favourite technique of mine. You can do it to any sponged or brayered background; just take a fine paintbrush with a little water, hold it over the project from about 10cm away and tap the top to flick water on it. If it looks like nothing has happened, just wait a few seconds to allow the ink to lift and you’ll see magical snowflakes appear in front of your very eyes. If you don’t just repeat the process. But be warned: if your paintbrush is too big or too full, you will get great big splashes instead of delicate dots.

Once you have your Northern Lights background you can do whatever you like with it. We added a snowy hill from the Home Together Dies, along with a little house, a greeting and some baker’s twine from the Flowers for Every Season Ribbon Combo Pack. And, of course, some of those must-have snowflakes, too!

Trimming the Town Home Together Dies Stampin Up

I hope you have been inspired by my Trimming the Town projects. Please head on over to the rest of the blogs in the hop for yet more inspiration. 
 

Monday 12 October 2020

In The Pines distressed texture card

In The Pines Stampin Up
 
It’s all about trees for me at the moment and I have been having LOTS of fun with the In The Pines Bundle recently.

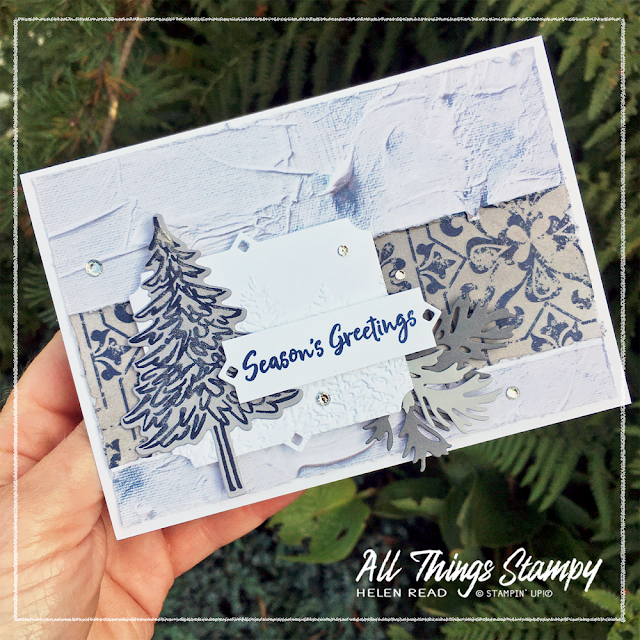
Today I would like to show you this very out-of-character project. Why out of character? Because it uses GREY. I don’t get the whole grey craze – grey walls, grey décor, grey clothes, grey cards. We have enough grey skies in this country without adding to the gloom!

But I pushed myself to use a little bit of Smoky Slate AND Basic Grey on this card, throwing in lots of texture to make it more “me”. 

In The Pines Stampin Up

As my backdrop, I have used the In Good Taste Designer Series Paper, which is SO versatile and even better, currently available at a 15% discount (until 31st October). 

In The Pines Stampin Up
 
I love this pack, which includes lots of lovely designs which give you the look of texture without the bulk. I mean, doesn’t that background look exactly like it’s been create with texture paste? Well it’s not – it’s printed paper and perfectly flat. For a change, and a blast from the past, I distressed the edges using the side of my Stampin’ Snips.

In The Pines Stampin Up
The patterned strip is from the same pack but I wanted it darker so I brayered on top of the design with some Smoky Slate ink. This is a great way of getting more mileage out of your Designer Series Paper. Brayer it, sponge it, stamp on it, colour in the images... these are all ways you can change the colour to make it fit your project.

In The Pines Stampin Up

As I’d already committed to using two sets of dies –  the Pine Woods Dies and Beautiful Boughs, I stuck with the latter for my labels. The greeting label uses the same die as the white panel behind it; it’s just trimmed down.

And the white panel behind is embossed using the Evergreen Forest 3D Embossing Folder. This was the first time I’d used this amazing folder but you’ll be seeing a lot more of it here next week.

The tree is stamped in Night of Navy onto Smoky Slate and die-cut. I’ve also painted over it using Wink of Stella to add some shine, but I’m not sure that comes out in the photo. Finally, some bling gives it another lift.
 
Hope you like it! Please come back on Thursday for another blog hop and some more trees! And if you are in the UK and are looking for a demonstrator, please get in touch or shop at my store using the link below. This month’s host code is ET479TKQ and if you use this when spending between £25 and £149, I’ll send you a thank you gift. (If you order over £150, don’t use the code as you will get your own Stampin’ Rewards.)


Thursday 8 October 2020

Home Together Dies masked moon card

Home Together Dies Stampin Up ideas

Just playing around with the Home Together dies and trying to come up with projects for tomorrow’s Crafty Friday event over Zoom. This is the one that got away.

To make this, I die-cut a circle (any circle will do) from a Post-It Note and stuck it to my card. I sponged around this mask using Pool Party ink. Then I simply built up the layers using die-cut hills and trees in Whisper White cardstock.

I finished off with a greeting from In The Pines in Misty Moonlight ink and some Pool Party ribbon to add shimmer and pick up the Pool Party around the moon.

No sticky notes in the house? Simply use thin copier paper and some Tombow Multipurpose Adhesive. Apply a few small dots on your circle and allow them to dry fully. This turns it into a temporary adhesive so you can remove the mask with care.

Home Together Dies Stampin Up ideas

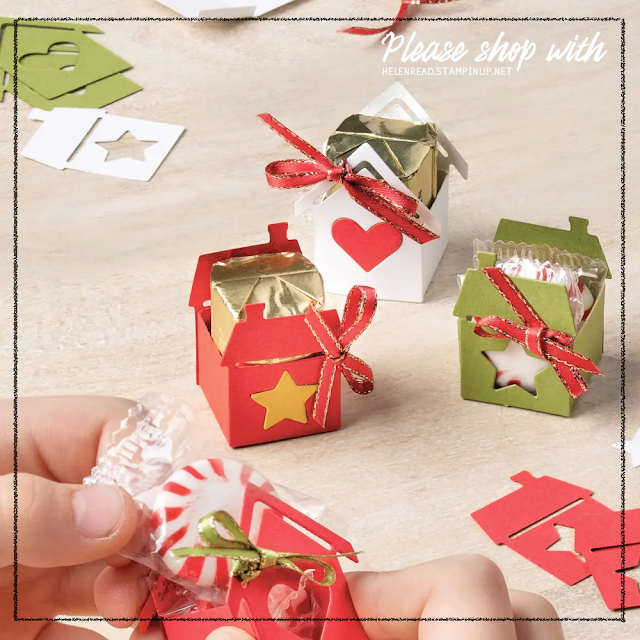
 Take a look at some of the other fab projects you could make with these dies...

Home Together Dies Stampin Up ideas

Home Together Dies Stampin Up ideas


The small print

This is my personal blog and my sole responsibility as an Independent Stampin' Up!® demonstrator. All images are © Stampin' Up!® All content including photographs, projects and text are © Helen Read, unless otherwise stated. Please feel free to copy my ideas for your personal use and inspiration - if you are a SU demonstrator you may use these ideas for your events but please give credit where it is due. Please do not use my ideas for monetary gain, competitions or publication. The images on this blog - including blog buttons - should not be copied and used elsewhere on the internet or on CDs.