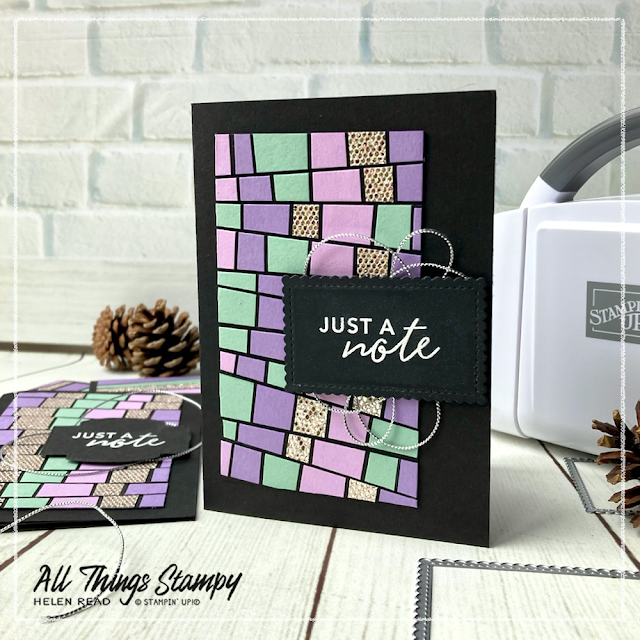
Have you heard of the Scrappy Strips technique developed by Aussie Stampin’ Up!® demonstrators Kylie and Bruno Bertucci? It’s brilliant for using up little scraps of cardstock and DSP and you can mix and match to your heart’s content.
It’s a simple 4-step technique:
1. Cut a panel to fit your card (I make my 5mm smaller than my card front, so if you’re using A4 cardstock that’s 10cm x 14.3cm)
2. Prepare four pieces of cardstock or Designer Series Paper – I cut these to 10.5cm x 14.8cm, so a quarter sheet of A4.
3.
Cut these into 2cm wide (or 1") strips (along the length or width, it
doesn’t matter), then cut each strip on the diagonal, roughly, without
measuring.
4. Assemble these strips onto your panel and trim off the excess.
That’s it. You now have a fun panel to add to your card front and finish off with a greeting label.
Oh and best of all, if you start off with four different colours/designs on the equivalent of four card fronts, you should have enough strips to create four cards as I did here.
I used a subtle colour combination of Highland Heather, Mint Macaron and Fresh Freesia against striking Basic Black, because I don’t do well with pale colours normally. I like the idea of including a
metallic finish in the design, although this lovely Be Dazzling
Speciality Paper from the Sale-a-Bration collection is quite thick, so
make sure you stick it down firmly and be careful when you cut it up.
Remember, Sale-a-Bration ends on Thursday so if you want Be Dazzling paper or any of the free
items, or want to join my team and get yourself a free bundle, please
act VERY fast. Don’t leave it until Thursday evening as the SU office
will be closed so no tech help will be available.
I have used this technique a few times without thinking much about its origin but last week I saw a card which took it to the next level and discovered that it had been developed by a demonstrator called Linda Driggs and again showcased by Kylie Bertucci.
This turns your scrappy strips into a wonderful mosaic pattern. What you do is complete steps 1-4 as above, then cut your finished panel up again into further strips. I learned after making my version that simple strips would suffice, but I went off-piste and cut my strips on the diagonal again. This results in a slightly eye-boggling finished card but I still quite like it.
I
mounted my panels onto black cardstock as I think that makes them extra
striking, and finished off with an embossed greeting in white on black.
However, I’m afraid I’ve broken my own rule here and used a retired
greeting; Just a Note comes from the retired Simply Citrus Card Kit, but
it’s such a useful sentiment and size of stamp that I hung onto it. I
didn’t realise my error until I was taking photos of the projects.
Oops.
Have you tried the scrappy strip technique? Why not give
it a go this week? Honestly, if you get hooked on this technique you
will never throw any scraps of cardstock of DSP away again.
If you are in the UK and would like to order, please To order these or any other current Stampin’ Up!® products from my store, please shop using this link


