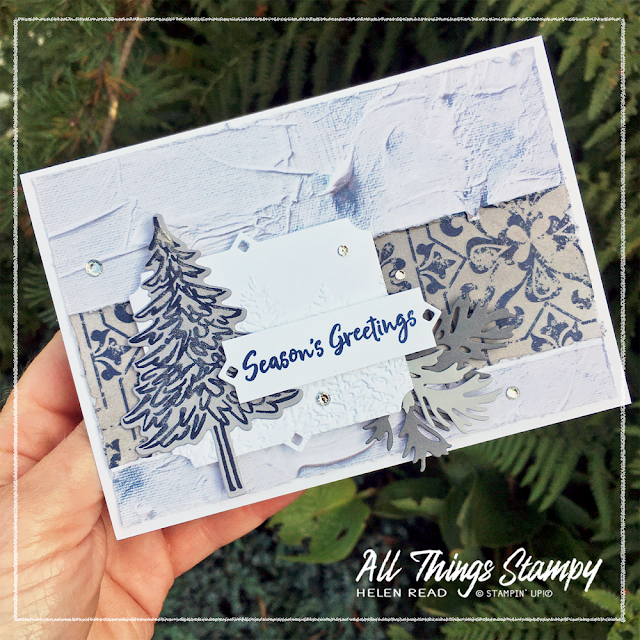
It’s all about trees for me at the moment and I have been having LOTS of fun with the
In The Pines Bundle recently.
Today
I would like to show you this very out-of-character project. Why out of
character? Because it uses GREY. I don’t get the whole grey craze –
grey walls, grey décor, grey clothes, grey cards. We have enough grey
skies in this country without adding to the gloom!
But I pushed
myself to use a little bit of Smoky Slate AND Basic Grey on this card,
throwing in lots of texture to make it more “me”.
I love this pack, which includes lots of lovely designs which give you the look of texture without the bulk. I mean, doesn’t that background look exactly like it’s been create with texture paste? Well it’s not – it’s printed paper and perfectly flat. For a change, and a blast from the past, I distressed the edges using the side of my
Stampin’ Snips.
The patterned strip is from the same pack but I wanted it darker so I brayered on top of the design with some Smoky Slate ink. This is a great way of getting more mileage out of your Designer Series Paper. Brayer it, sponge it, stamp on it, colour in the images... these are all ways you can change the colour to make it fit your project.
As I’d already committed to using two sets of dies – the
Pine Woods Dies and
Beautiful Boughs, I stuck with the latter for my labels. The greeting label uses the same die as the white panel behind it; it’s just trimmed down.
And the white panel behind is embossed using the
Evergreen Forest 3D Embossing Folder. This was the first time I’d used this amazing folder but you’ll be seeing a lot more of it here next week.
The tree is stamped in Night of Navy onto Smoky Slate and die-cut. I’ve also painted over it using
Wink of Stella to add some shine, but I’m not sure that comes out in the photo. Finally, some bling gives it another lift.
Hope you like it! Please come back on Thursday for another blog hop and some more trees! And if you are in the UK and are looking for a demonstrator, please get in touch or shop at my store
using the link below. This month’s host code is ET479TKQ and if you use this when spending between £25 and £149, I’ll send you a thank you gift. (If you order over £150, don’t use the code as you will get your own Stampin’ Rewards.)


No comments:
Post a Comment
Thank you so much for taking the time to comment.