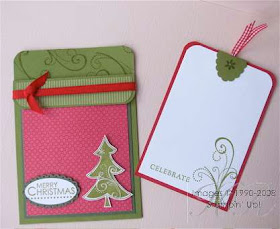
 This is the second card we made on my table at the Christmas card class at the weekend. It’s a pocket card.
Pocket cards are really simple to make but look really impressive. I prefer to make them by cutting a sheet of A4 in half lengthways. Score half way as if you were making a portrait card which opens at the bottom, then score again about an inch from one end.
Fold this into a card, then fold the 1” flap outwards.
You now need to seal the card to make it into a pocket. I used Sticky Strip down the sides on this one – it’s strong, it’s narrow and it will do the job brilliantly. If you don’t have sticky strip, beware of ordinary double-sided tape as it’s probably not going to be strong enough and may also be too wide, which restricts the width of the inside tag. To get round this you could seal the pocket using eyelets or brads... or even sew the sides.
 The Large Oval Punch and accompanying Scallop Oval Punch proved really popular – we’ve used both on this card; on the front, as you can see, and the Scallop Oval again on the tag. To make the top of the tag, we folded a scalloped oval in half, punched a hole on the crease, then poked the loop of a short piece of ribbon through the hole, sealing it on the inside. This was then attached to the top of the tag, which slides into the pocket.
Stamps: Season of Joy, Basic Phrases
Cardstock: Old Olive, Always Artichoke, Real Red, Whisper White
Paper: Summer Picnic
Ink: Old Olive
Accessories: Scallop Oval Punch, Large Oval Punch, ¼” Grosgrain Ribbon – Real Red, Red Gingham Ribbon, Crafters’ Toolkit, Stampin’ Glitter – Dazzling Diamonds, Sticky Strip, Crop-A-Dile™
All products by Stampin' Up! Please email me to order a catalogue, or click the picture of the catalogue on the right to view it online.
 This is the second card we made on my table at the Christmas card class at the weekend. It’s a pocket card.
Pocket cards are really simple to make but look really impressive. I prefer to make them by cutting a sheet of A4 in half lengthways. Score half way as if you were making a portrait card which opens at the bottom, then score again about an inch from one end.
Fold this into a card, then fold the 1” flap outwards.
You now need to seal the card to make it into a pocket. I used Sticky Strip down the sides on this one – it’s strong, it’s narrow and it will do the job brilliantly. If you don’t have sticky strip, beware of ordinary double-sided tape as it’s probably not going to be strong enough and may also be too wide, which restricts the width of the inside tag. To get round this you could seal the pocket using eyelets or brads... or even sew the sides.
 The Large Oval Punch and accompanying Scallop Oval Punch proved really popular – we’ve used both on this card; on the front, as you can see, and the Scallop Oval again on the tag. To make the top of the tag, we folded a scalloped oval in half, punched a hole on the crease, then poked the loop of a short piece of ribbon through the hole, sealing it on the inside. This was then attached to the top of the tag, which slides into the pocket.
Stamps: Season of Joy, Basic Phrases
Cardstock: Old Olive, Always Artichoke, Real Red, Whisper White
Paper: Summer Picnic
Ink: Old Olive
Accessories: Scallop Oval Punch, Large Oval Punch, ¼” Grosgrain Ribbon – Real Red, Red Gingham Ribbon, Crafters’ Toolkit, Stampin’ Glitter – Dazzling Diamonds, Sticky Strip, Crop-A-Dile™
All products by Stampin' Up! Please email me to order a catalogue, or click the picture of the catalogue on the right to view it online.

Great project Helen - I'm putting it in the ideas file for future reference!
ReplyDeleteCute pocket card....maybe I should start on Christmas cards too! tfs!!!
ReplyDeleteI love this idea - fab colours too! I usually leave Christmas cards until the very last minute! I really should be more organised this year LOL!
ReplyDeleteAimes
x