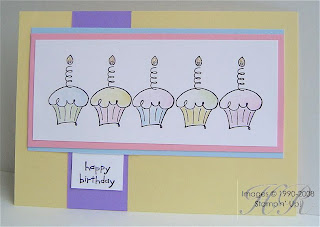
As soon as I got my Stamp-a-ma-jig® I knew I had to make a row of fairy cakes. They look so delicious with their coloured cakes and different shades of icing – I wish I could make them look like this instead of the lumpy messes I produce.
I don’t know if you can see it but there’s glitter on the flames. Glitter only in moderation is my motto!
The Stamp-a-ma-jig® is a marvellous tool. I already have a stamp positioner which is in the shape of large T but I've never really got on with it. When I saw the Stamp-a-ma-jig® demoed at the Birmingham Open Night I had to have it! It comes with a clear imaging sheet which you position in the corner of the tool (I can't keep typing its proper name!) and then stamp on. Remove the sheet and use it to position exactly where you want your image on your project. Place the tool around the imaging sheet, then remove the sheet and position your stamp into the corner of the tool. It's hard to explain but I can demo it if you book a workshop.
Stamps: Birthday Best (34)
Cardstock: Barely Banana, Bashful Blue, Pretty in Pink, Lavender Lace, Whisper White
Ink: Basic Black
Accessories: Stampin’ Write Markers (p71), Stampin’ Glitter (p82)
All products by Stampin' Up! Please email me to order a catalogue, or click the link on the right to view it online.

This turned out great....I haven't quite figured out the stamping straight line. (I cannot remember the name.) Does it really help make a difference? and worth the price? How easy was it? Jennie (jennie_hi@yahoo.com)
ReplyDeleteSorry...I didn't read close enough. You answered most of my questions. LOL
ReplyDeleteI, too, resisted buying the Stamp-a-ma-jig but now I have it, I LOVE it. Love your card too - so pretty. CC
ReplyDeleteI have never been able to Stamp-a-ma-jig!! This is cute!
ReplyDeleteAdorable! I really love this card!!
ReplyDeleteJessica Lynn
I clicked on your blog link from SCS (truth be told it was your David Tennant icon that grabbed my attention lol) and just wanted to say how gorgeous your cards are :-)
ReplyDeleteGreat use of your Stamp-a-ma-jig! Cute card!
ReplyDeleteThese cupcakes are adorable... great card.
ReplyDelete