Thursday, 28 January 2021

Flowering Cactus Product Medley blog hop and free tutorial

Flowering Cactus Stampin Up

I’m excited to be taking part in another blog hop with talented Stampin’ Up!® demonstrators from around the world. 

Flowering Cactus blog hop Stampin Up

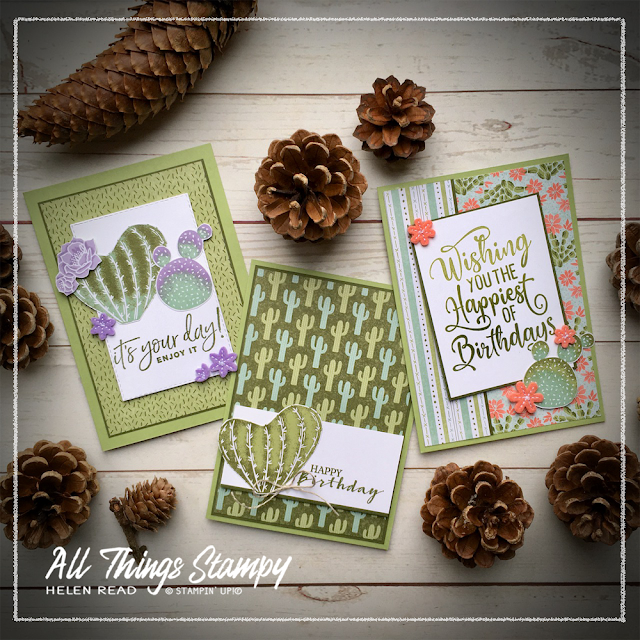
This time we are focusing our attentions on the Flowering Cactus Product Medley. I have overlooked these product medleys in the past as they are quite the investment at £65. But, as lockdown continues (forever and ever and ever!), I’ve started looking at different ways of using products in my Zoom-based classes. And the refill kits are perfect. 

Flowering Cactus Stampin Up

This Flowering Cactus Product Medley refill is just £33 and can be split into two, four or even eight, depending on the price level of a class. For my Crafty Friday class in February, where we only make two cards, I have split the kit into eight so everyone will get one sheet of each 6x6 Designer Series Paper design. This includes an ever-so-handy sheet of large images (the one you see on the top in the pic above) which can be cut out to create focal points for your cards; all you need to add are card bases, some Basic White cardstock and some greeting stamps.

If you repeated these designs to use the whole pack, you’d have enough to make 40 cards! 

Flowering Cactus Stampin Up

This card is a simple M-fold design, and I really do mean simple because I just don’t have the patience or skill for proper fancy folds. 

Flowering Cactus Stampin Up

It starts with a card base created by cutting the card in half lengthways. Then you take a quarter sheet of card, score along the short edge to create a flap which you use to attach to the main body of the card, then score the remainder in half to create the front of the M.

Confused? Check out my tutorial here

Flowering Cactus Stampin Up

Flowering Cactus Stampin Up

This patchwork card was intended as one of the Crafty Friday projects in February but I've had second thoughts about that as it was quite fiddly to get everything to line up. But if you were making it at home it would be a great way to use up any little leftover pieces.


Want to have a go at this patchwork card but can’t be bothered with the measurements? Why not butt all the pieces up together on some scrap paper, stick them down and then cut out your card front shape? Sounds much easier!


Flowering Cactus Stampin Up

Here I’ve used one of my favourite and most-used stamp sets, Happiest of Birthdays, which I've inked up with three shades of green; Pear Pizzazz, Old Olive and Mossy Meadow. You can do this in several ways but I like to use the Stamparatus to ink up each area separately and then stamp, knowing that I’ll hit the right spot each time.

Flowering Cactus Stampin Up


I wanted to include a masculine card in the batch so made this using all greens and just a small bow in Linen Thread. Quick and simple but I’m sorry, I like to divert my energies into cards for the most appreciative recipients!

Flowering Cactus Stampin Up

This was the final card I made from my designated 1/8th of the refill kit but turned out to be one of my favourites. I love the Highland Heather accents which give you a gorgeous, gentle colour combination with the Pear Pizzazz, Old Olive and Mint Macaron. 

Flowering Cactus Stampin Up

I hope you've been inspired to take another look at our different refill kits as there really are so many ways you can use our products. Especially when we can't meet up in person (SO jealous of Australia and New Zealand!), these kits provide a fun way to hold and attend classes when everyone doesn’t have the stamp set. 

Now please take a trip around to world to see what other fabulous projects have been made by amazing Stampin’ Up!® demonstrators...


Flowering Cactus Stampin Up

This Flowering Cactus Product Medley Suite will allow you to make dozens of fabulous card. If you live in the UK and would like to order the Suite, the refill kit or any other Stampin’ Up!® products, please visit my store and, if you use the host code YK2NNMYW, I’ll send you a little thank you gift in February! 

To make it easy for you, please shop using this link (opens in new window)

Does your wish list come to more than £99? Please get in touch and I will help you get more for your money and unlock discounts all year round.  Please message me via my website.


Read More »
Flowering Cactus Stampin Up

I’m excited to be taking part in another blog hop with talented Stampin’ Up!® demonstrators from around the world. 

Flowering Cactus blog hop Stampin Up

This time we are focusing our attentions on the Flowering Cactus Product Medley. I have overlooked these product medleys in the past as they are quite the investment at £65. But, as lockdown continues (forever and ever and ever!), I’ve started looking at different ways of using products in my Zoom-based classes. And the refill kits are perfect. 

Flowering Cactus Stampin Up

This Flowering Cactus Product Medley refill is just £33 and can be split into two, four or even eight, depending on the price level of a class. For my Crafty Friday class in February, where we only make two cards, I have split the kit into eight so everyone will get one sheet of each 6x6 Designer Series Paper design. This includes an ever-so-handy sheet of large images (the one you see on the top in the pic above) which can be cut out to create focal points for your cards; all you need to add are card bases, some Basic White cardstock and some greeting stamps.

If you repeated these designs to use the whole pack, you’d have enough to make 40 cards! 

Flowering Cactus Stampin Up

This card is a simple M-fold design, and I really do mean simple because I just don’t have the patience or skill for proper fancy folds. 

Flowering Cactus Stampin Up

It starts with a card base created by cutting the card in half lengthways. Then you take a quarter sheet of card, score along the short edge to create a flap which you use to attach to the main body of the card, then score the remainder in half to create the front of the M.

Confused? Check out my tutorial here

Flowering Cactus Stampin Up

Flowering Cactus Stampin Up

This patchwork card was intended as one of the Crafty Friday projects in February but I've had second thoughts about that as it was quite fiddly to get everything to line up. But if you were making it at home it would be a great way to use up any little leftover pieces.


Want to have a go at this patchwork card but can’t be bothered with the measurements? Why not butt all the pieces up together on some scrap paper, stick them down and then cut out your card front shape? Sounds much easier!


Flowering Cactus Stampin Up

Here I’ve used one of my favourite and most-used stamp sets, Happiest of Birthdays, which I've inked up with three shades of green; Pear Pizzazz, Old Olive and Mossy Meadow. You can do this in several ways but I like to use the Stamparatus to ink up each area separately and then stamp, knowing that I’ll hit the right spot each time.

Flowering Cactus Stampin Up


I wanted to include a masculine card in the batch so made this using all greens and just a small bow in Linen Thread. Quick and simple but I’m sorry, I like to divert my energies into cards for the most appreciative recipients!

Flowering Cactus Stampin Up

This was the final card I made from my designated 1/8th of the refill kit but turned out to be one of my favourites. I love the Highland Heather accents which give you a gorgeous, gentle colour combination with the Pear Pizzazz, Old Olive and Mint Macaron. 

Flowering Cactus Stampin Up

I hope you've been inspired to take another look at our different refill kits as there really are so many ways you can use our products. Especially when we can't meet up in person (SO jealous of Australia and New Zealand!), these kits provide a fun way to hold and attend classes when everyone doesn’t have the stamp set. 

Now please take a trip around to world to see what other fabulous projects have been made by amazing Stampin’ Up!® demonstrators...


Flowering Cactus Stampin Up

This Flowering Cactus Product Medley Suite will allow you to make dozens of fabulous card. If you live in the UK and would like to order the Suite, the refill kit or any other Stampin’ Up!® products, please visit my store and, if you use the host code YK2NNMYW, I’ll send you a little thank you gift in February! 

To make it easy for you, please shop using this link (opens in new window)

Does your wish list come to more than £99? Please get in touch and I will help you get more for your money and unlock discounts all year round.  Please message me via my website.


Monday, 25 January 2021

Tutorials: Double Dutch Door Fold and Desk Calendar


Our first Crafty Friday of the year saw us use this gorgeous Flower & Field DSP from the Sale-a-Bration brochure. This beautiful paper is free with a £45 order during January and February.
 
 
During the morning, we made two projects using just two 6x6 pieces of paper (cut from 12x12 sheets). A I only had one pack to play with, not everybody received the same designs, which is quite nice as we get to see lots of variations on the different projects. 
 

We began with this fun Double Dutch Door Fold. And question of the day was “what is a double Dutch door?” Turns out a Dutch door is what we in the UK know as a stable door... and suddenly the card design makes sense!
 

I don’t do complicated fancy folds so this one was right up my street. You begin by cutting a standard piece of cardstock (A4 in most countries) and cutting it in half lengthways to create a card base. Slice off a section of the front then create the bottom doors from a separate, wrap-around piece.


As this was a remote class, guests were using their own greeting stamps to complete the card. Therefore I sent them a selection of die-cut and punched pieces for decoration. I used Nature’s Roots Dies to create these pretty Granny Apple Green leaves and the Small Bloom Punch for some Bumblebee flowers. The mini flower accents are created using the Confetti Flowers Border Punch. I have to say, punching lots of flowers is easier than die-cutting lots of leaves!

 
Use the piece you slice off the front of the card to create a layer for your main greeting/image panel. Waste not, want not.


Our second project was this cute desk calendar. I have to thank my downline Tracey for the inspiration for this as she made one for me for Christmas. 
 

Again this starts with a simple card base, created by cutting a sheet of cardstock in half lengthways. A second piece of cardstock creates a supporting piece and a third creates a simple box on the front for a sticky note pad and pen or pencil. You could decorate it further if you wish, but I like to let the DSP do all the hard work here. 


This side view shows how the supporting piece works. Simple but effective, and stops the weight of the pad making the card fall open. 

You can earn this gorgeous Designer Series Paper FREE during Sale-a-Bration, which runs to the end of Feburary. This is one of your choices when you place a £45 order. If you are in the UK and would like to order, please visit my store and, if you use the host code YK2NNMYW, I’ll send you a little thank you gift in February!

To make it easy for you, please shop using this link (opens in new window)

Does your wish list come to more than £99? Please get in touch and I will help you get more for your money and unlock discounts all year round.  Please message me via my website.
 
NB: Please note orders are currently taking longer than usual to arrive, due to a combination of extra paperwork required following Brexit, lower staffing levels due to the pandemic, and an influx of orders as a result of both lockdown and Sale-a-Bration. Please ask if you require more information.  


Read More »


Our first Crafty Friday of the year saw us use this gorgeous Flower & Field DSP from the Sale-a-Bration brochure. This beautiful paper is free with a £45 order during January and February.
 
 
During the morning, we made two projects using just two 6x6 pieces of paper (cut from 12x12 sheets). A I only had one pack to play with, not everybody received the same designs, which is quite nice as we get to see lots of variations on the different projects. 
 

We began with this fun Double Dutch Door Fold. And question of the day was “what is a double Dutch door?” Turns out a Dutch door is what we in the UK know as a stable door... and suddenly the card design makes sense!
 

I don’t do complicated fancy folds so this one was right up my street. You begin by cutting a standard piece of cardstock (A4 in most countries) and cutting it in half lengthways to create a card base. Slice off a section of the front then create the bottom doors from a separate, wrap-around piece.


As this was a remote class, guests were using their own greeting stamps to complete the card. Therefore I sent them a selection of die-cut and punched pieces for decoration. I used Nature’s Roots Dies to create these pretty Granny Apple Green leaves and the Small Bloom Punch for some Bumblebee flowers. The mini flower accents are created using the Confetti Flowers Border Punch. I have to say, punching lots of flowers is easier than die-cutting lots of leaves!

 
Use the piece you slice off the front of the card to create a layer for your main greeting/image panel. Waste not, want not.


Our second project was this cute desk calendar. I have to thank my downline Tracey for the inspiration for this as she made one for me for Christmas. 
 

Again this starts with a simple card base, created by cutting a sheet of cardstock in half lengthways. A second piece of cardstock creates a supporting piece and a third creates a simple box on the front for a sticky note pad and pen or pencil. You could decorate it further if you wish, but I like to let the DSP do all the hard work here. 


This side view shows how the supporting piece works. Simple but effective, and stops the weight of the pad making the card fall open. 

You can earn this gorgeous Designer Series Paper FREE during Sale-a-Bration, which runs to the end of Feburary. This is one of your choices when you place a £45 order. If you are in the UK and would like to order, please visit my store and, if you use the host code YK2NNMYW, I’ll send you a little thank you gift in February!

To make it easy for you, please shop using this link (opens in new window)

Does your wish list come to more than £99? Please get in touch and I will help you get more for your money and unlock discounts all year round.  Please message me via my website.
 
NB: Please note orders are currently taking longer than usual to arrive, due to a combination of extra paperwork required following Brexit, lower staffing levels due to the pandemic, and an influx of orders as a result of both lockdown and Sale-a-Bration. Please ask if you require more information.  


Monday, 18 January 2021

Serene cards with the Dandy Garden Suite

 Dandy Garden Dandelion Wishes Stampin Up

Have I mentioned how much I love the Dandy Garden Suite? Thought so. But is that going to stop me telling you again? No way! Here are some of the projects I’ve been making with this Suite lately.

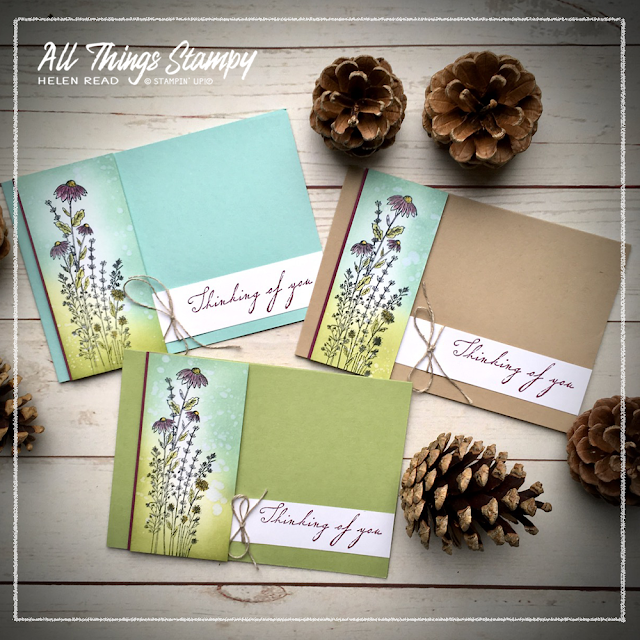
I needed to replenish my stock of ‘Thinking of You’ cards after my Mum totally cleaned out my last batch. She said she needed two cards so I sent her everything I had so she could choose and the box came back empty. 

Dandy Garden Dandelion Wishes Stampin Up  

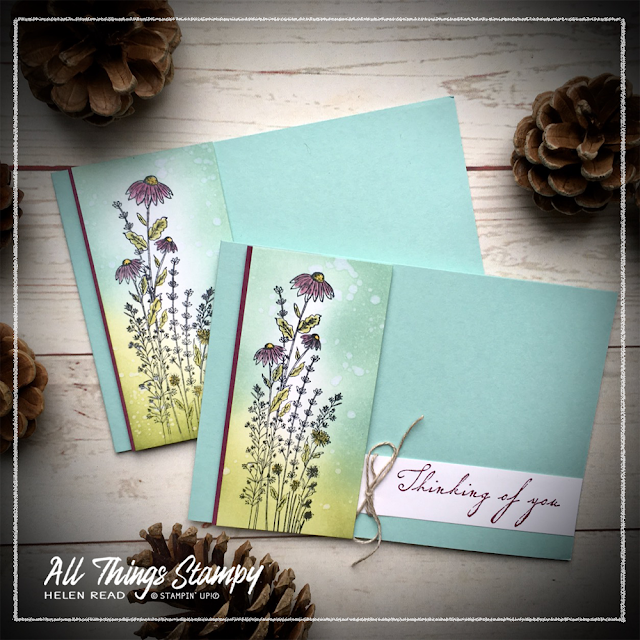
This set is just perfect for simple, understated cards for such an occasion, so I made a handful by stamping the tall flowers image from Dragonfly Garden onto white cardstock and lightly colouring the image using Stampin’ Blends. The greeting on this card comes from Peaceful Moments

Dandy Garden Dandelion Wishes Stampin Up

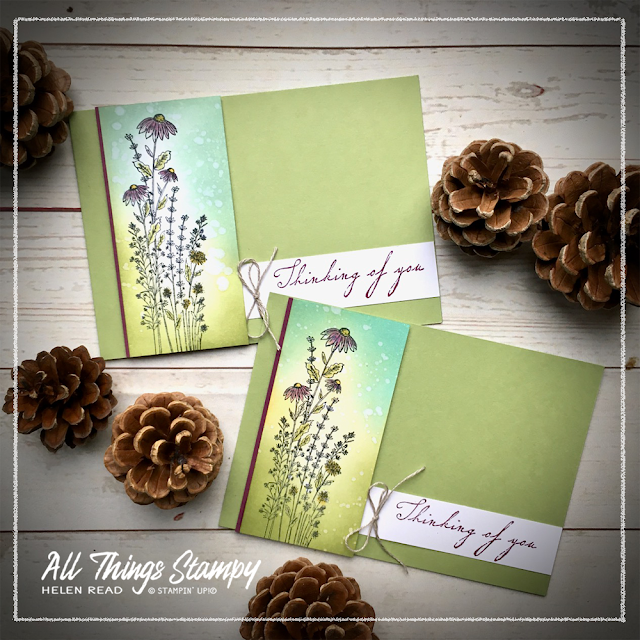
On most of the cards, I adding some background using our fabulous new Blending Brushes. These are so easy to use and create lovely soft backgrounds. On top of this I flicked some clean water to create a speckled effect, a technique I love for its simplicity.  The greeting on this card some from Field of Flowers

Dandy Garden Dandelion Wishes Stampin Up

Dandy Garden Dandelion Wishes Stampin Up

Dandy Garden Dandelion Wishes Stampin Up
 

I mounted them onto some card blanks I’d made previously (I keep a box of these on hand from leftover Make & Takes and projects where I change my mind partway through) and soon rustled up a batch of these landscape cards, finishing off with a greeting from Woven Heirlooms and some Linen Thread.

Dandy Garden Dandelion Wishes Stampin Up

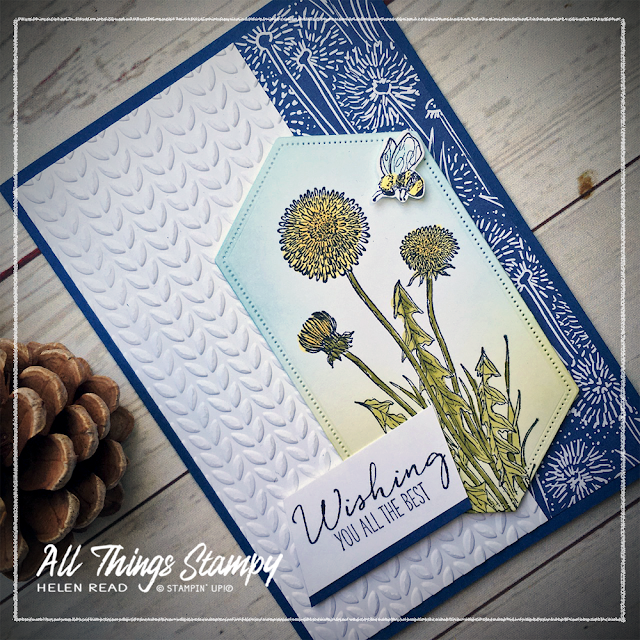
For something a bit more complex, I used a big chunk of my craft supplies, starting with the Dandy Wishes Dies. These coordinate with the Garden Wishes stamp set and are available as part of a bundle, too.

The image panel is created using Tasteful Labels Dies, which are probably the most-used dies in my craft room since they were released last summer. The greeting here is from Happiest of Birthdays, which is probably my most-used greeting stamp set of the past 12 months, too. The background is one of the Greenery Embossing Folders, another much-loved product in this house. 

Dandy Garden Dandelion Wishes Stampin Up

Inside I used Happiest of Birthdays again, along with a dandelion image from the
Garden Wishes stamp set. 

Dandy Garden Dandelion Wishes Stampin Up
  

The entire Dandy Garden Suite is a must-have, in my opinion! If you’d like to order any of the items shown here, or indeed any other Stampin’ Up!® products, please head on over to my store and, if you use the host code YK2NNMYW, I’ll send you a little thank you gift in February! 

To make it easy for you, please shop using this link (opens in new window)
Does your wish list come to more than £99? Please get in touch and I will help you get more for your money and unlock discounts all year round.  Please message me via my website.


Read More »

 Dandy Garden Dandelion Wishes Stampin Up

Have I mentioned how much I love the Dandy Garden Suite? Thought so. But is that going to stop me telling you again? No way! Here are some of the projects I’ve been making with this Suite lately.

I needed to replenish my stock of ‘Thinking of You’ cards after my Mum totally cleaned out my last batch. She said she needed two cards so I sent her everything I had so she could choose and the box came back empty. 

Dandy Garden Dandelion Wishes Stampin Up  

This set is just perfect for simple, understated cards for such an occasion, so I made a handful by stamping the tall flowers image from Dragonfly Garden onto white cardstock and lightly colouring the image using Stampin’ Blends. The greeting on this card comes from Peaceful Moments

Dandy Garden Dandelion Wishes Stampin Up

On most of the cards, I adding some background using our fabulous new Blending Brushes. These are so easy to use and create lovely soft backgrounds. On top of this I flicked some clean water to create a speckled effect, a technique I love for its simplicity.  The greeting on this card some from Field of Flowers

Dandy Garden Dandelion Wishes Stampin Up

Dandy Garden Dandelion Wishes Stampin Up

Dandy Garden Dandelion Wishes Stampin Up
 

I mounted them onto some card blanks I’d made previously (I keep a box of these on hand from leftover Make & Takes and projects where I change my mind partway through) and soon rustled up a batch of these landscape cards, finishing off with a greeting from Woven Heirlooms and some Linen Thread.

Dandy Garden Dandelion Wishes Stampin Up

For something a bit more complex, I used a big chunk of my craft supplies, starting with the Dandy Wishes Dies. These coordinate with the Garden Wishes stamp set and are available as part of a bundle, too.

The image panel is created using Tasteful Labels Dies, which are probably the most-used dies in my craft room since they were released last summer. The greeting here is from Happiest of Birthdays, which is probably my most-used greeting stamp set of the past 12 months, too. The background is one of the Greenery Embossing Folders, another much-loved product in this house. 

Dandy Garden Dandelion Wishes Stampin Up

Inside I used Happiest of Birthdays again, along with a dandelion image from the
Garden Wishes stamp set. 

Dandy Garden Dandelion Wishes Stampin Up
  

The entire Dandy Garden Suite is a must-have, in my opinion! If you’d like to order any of the items shown here, or indeed any other Stampin’ Up!® products, please head on over to my store and, if you use the host code YK2NNMYW, I’ll send you a little thank you gift in February! 

To make it easy for you, please shop using this link (opens in new window)

Does your wish list come to more than £99? Please get in touch and I will help you get more for your money and unlock discounts all year round.  Please message me via my website.


Monday, 11 January 2021

Sale-a-Bration 2021: Darling Donkeys and Flower & Field Designer Series Paper

Darling Donkeys Flowers Field Stampin Up

Sale-a-Bration is now well under way and, as predicted, this Darling Donkeys stamp set is proving to be a winner. Who could resist these cute images? And you know me, I don’t normally fall for cute stamp images. 

Darling Donkeys Flowers Field Stampin Up

I showed off this project at my Twixmas Party in an interactive demonstration. Guests could vote via the Zoom polling feature on which image I should stamp, which DSP I should use and which cardstock. The above card was the result, with a Bumblebee cardstock layer and a frame created with the Layering Circles Dies

Darling Donkeys Flowers Field Stampin Up

However, I had this one ready made to show them how the card could have looked if they had made different choices, such as a Granny Apple Green cardstock layer. This image fits better in the Layering Ovals Dies, which I had cut in advance. Yes, I guessed what they’d choose and made the opposite – seems that I do know them quite well!

I can’t lay claim to the project idea, which was originally created by Diana Gibbs. It's such a lovely design that I just had to CASE (Copy And Share Everything) it. I particularly I love the use of the In Good Taste DSP with the Flower & Field DSP.

Darling Donkeys Flowers Field Stampin Up

I coloured the images using Stampin’ Blends after falling in love with these all over again recently. Crumb Cake for the body, Smoky Slate for the hooves, Granny Apple Green for the grass and Pool Party for the sky.

The “hee haw” greeting is hand cut from cardstock, simply following the lines of the curvy image. 

Darling Donkeys Flowers Field Stampin Up

The Darling Donkeys stamp set is one of six stamp sets you can choose as your FREE Sale-a-Bration item when you place a qualifying order during January and February 2021. Darling Donkeys can be earned with a £45 order.

The Flower & Field Designer Series Paper is one of four packs of paper in the brochure and that, too, can be earned with a £45 order. I love the bright colours on the dark backgrounds; some of them remind me a little of traditional canal art, while others remind me of mille-fleurs tapestries.

It’s gorgeous paper and I will be using it at my Crafty Friday Zoom class this week, when we make a fancy fold card and a mini desk calendar.

Want to earn your own Darling Donkeys stamp set or Flower & Field Designer Series Paper? Or do you have your eye on something else from the Sale-a-Bration brochure? Please head on over to my store and, if you use the host code YK2NNMYW, I’ll send you a little thank you gift in February!


Read More »

Darling Donkeys Flowers Field Stampin Up

Sale-a-Bration is now well under way and, as predicted, this Darling Donkeys stamp set is proving to be a winner. Who could resist these cute images? And you know me, I don’t normally fall for cute stamp images. 

Darling Donkeys Flowers Field Stampin Up

I showed off this project at my Twixmas Party in an interactive demonstration. Guests could vote via the Zoom polling feature on which image I should stamp, which DSP I should use and which cardstock. The above card was the result, with a Bumblebee cardstock layer and a frame created with the Layering Circles Dies

Darling Donkeys Flowers Field Stampin Up

However, I had this one ready made to show them how the card could have looked if they had made different choices, such as a Granny Apple Green cardstock layer. This image fits better in the Layering Ovals Dies, which I had cut in advance. Yes, I guessed what they’d choose and made the opposite – seems that I do know them quite well!

I can’t lay claim to the project idea, which was originally created by Diana Gibbs. It's such a lovely design that I just had to CASE (Copy And Share Everything) it. I particularly I love the use of the In Good Taste DSP with the Flower & Field DSP.

Darling Donkeys Flowers Field Stampin Up

I coloured the images using Stampin’ Blends after falling in love with these all over again recently. Crumb Cake for the body, Smoky Slate for the hooves, Granny Apple Green for the grass and Pool Party for the sky.

The “hee haw” greeting is hand cut from cardstock, simply following the lines of the curvy image. 

Darling Donkeys Flowers Field Stampin Up

The Darling Donkeys stamp set is one of six stamp sets you can choose as your FREE Sale-a-Bration item when you place a qualifying order during January and February 2021. Darling Donkeys can be earned with a £45 order.

The Flower & Field Designer Series Paper is one of four packs of paper in the brochure and that, too, can be earned with a £45 order. I love the bright colours on the dark backgrounds; some of them remind me a little of traditional canal art, while others remind me of mille-fleurs tapestries.

It’s gorgeous paper and I will be using it at my Crafty Friday Zoom class this week, when we make a fancy fold card and a mini desk calendar.

Want to earn your own Darling Donkeys stamp set or Flower & Field Designer Series Paper? Or do you have your eye on something else from the Sale-a-Bration brochure? Please head on over to my store and, if you use the host code YK2NNMYW, I’ll send you a little thank you gift in February!


Monday, 4 January 2021

Best Suite ever? Dandy Garden featuring Dragonfly Garden and Garden Wishes

Stampin Up Dandy Garden Dragonfly Wishes

When I say the Dandy Garden Suite is my favourite of all time, I do not use those words lightly. I have been a Stampin’ Up!® demonstrator for 13 years now and this is honestly the most gorgeous suite I have ever seen. I’ve liked plenty of suites in the past and loved many of them a lot... but none has spoken to me like this one.

Stampin Up Dandy Garden Dragonfly Wishes

Last week I held my annual Twixmas Party, albeit this time on Zoom. In fact, the Zoom format worked so well for this event that I think this one will definitely remain on Zoom in the future, even when we are allowed to meet again. Nobody had to worry about the weather, and guests could celebrate with a glass of fizz if they wished.

Stampin Up Dandy Garden Dragonfly Wishes

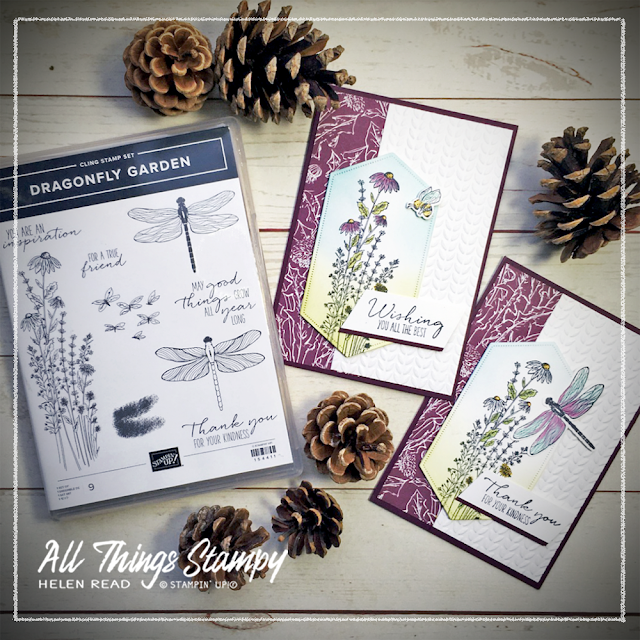
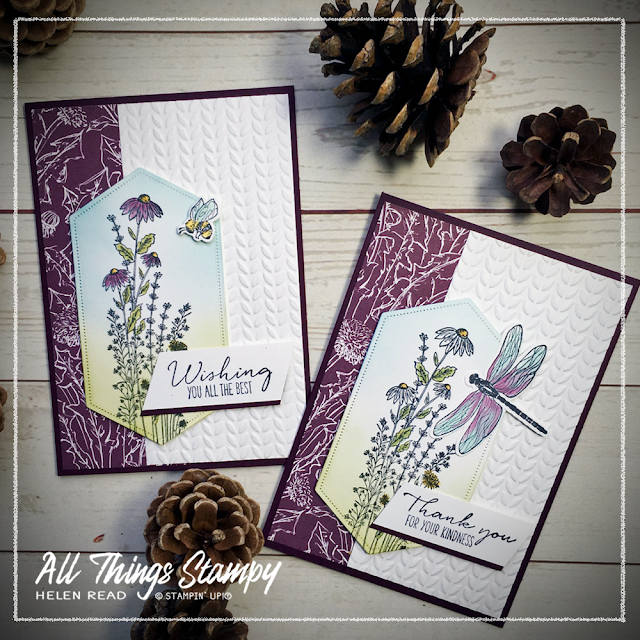
We had games, prizes and demonstrations. For this demo I used the Zoom polling feature so the guests could choose what I made. This was the winning design; guests voted for the Dragonfly Garden stamp set, the Blackberry Bliss colourway and finally to embellish with a die-cut bee from the Dandy Wishes Dies set rather than a dragonfly using the new Dragonfly Punch. Of course, I had some variations to show them afterwards, too, so everybody got to see their choices in the end, even if they didn’t cast a winning vote.

Stampin Up Dandy Garden Dragonfly Wishes

I took the opportunity to demonstrate the gorgeous new Blending Brushes which feature in the new January-June Mini Catalogue (p70, £11.25 for three). These are SO luscious and so easy to use. Even my 20-year-old son – who normally shows zero interest in craft supplies – picked one up and said “why are these so nice?”


They look like sponges in the catalogue photo but are actually very dense brushes with the softest bristles. You can rinse them under the tap when you’ve finished and because they are synthetic, they dry very quickly, although having three in a pack means you can switch between colours without risking getting water on your project.

Stampin Up Dandy Garden Dragonfly Wishes

It was also the first public outing for my Mini Stampin’ Cut & Emboss Machine, nicknamed Little Roland. This fits the Greenery Embossing Folders perfectly and is more than adequate for the vast majority of our dies, including the Stitched Nested Labels Dies I’ve used here.

Stampin Up Dandy Garden Dragonfly Wishes

Little Roland and the Dandy Garden Suite all go live tomorrow with the launch of the January-June Mini Catalogue, which is when Sale-a-Bration goes live, too!

Here are some tips for shopping wisely:

Stampin Up Dandy Garden Dragonfly Wishes

The Blending Brushes give you a soft, natural-looking background which offsets these images perfectly. The wildflower image requires very little colouring, so giving it a hint of a background allows the image to stand out.

Stampin Up Dandy Garden Dragonfly Wishes


Read More »
Stampin Up Dandy Garden Dragonfly Wishes

When I say the Dandy Garden Suite is my favourite of all time, I do not use those words lightly. I have been a Stampin’ Up!® demonstrator for 13 years now and this is honestly the most gorgeous suite I have ever seen. I’ve liked plenty of suites in the past and loved many of them a lot... but none has spoken to me like this one.

Stampin Up Dandy Garden Dragonfly Wishes

Last week I held my annual Twixmas Party, albeit this time on Zoom. In fact, the Zoom format worked so well for this event that I think this one will definitely remain on Zoom in the future, even when we are allowed to meet again. Nobody had to worry about the weather, and guests could celebrate with a glass of fizz if they wished.

Stampin Up Dandy Garden Dragonfly Wishes

We had games, prizes and demonstrations. For this demo I used the Zoom polling feature so the guests could choose what I made. This was the winning design; guests voted for the Dragonfly Garden stamp set, the Blackberry Bliss colourway and finally to embellish with a die-cut bee from the Dandy Wishes Dies set rather than a dragonfly using the new Dragonfly Punch. Of course, I had some variations to show them afterwards, too, so everybody got to see their choices in the end, even if they didn’t cast a winning vote.

Stampin Up Dandy Garden Dragonfly Wishes

I took the opportunity to demonstrate the gorgeous new Blending Brushes which feature in the new January-June Mini Catalogue (p70, £11.25 for three). These are SO luscious and so easy to use. Even my 20-year-old son – who normally shows zero interest in craft supplies – picked one up and said “why are these so nice?”


They look like sponges in the catalogue photo but are actually very dense brushes with the softest bristles. You can rinse them under the tap when you’ve finished and because they are synthetic, they dry very quickly, although having three in a pack means you can switch between colours without risking getting water on your project.

Stampin Up Dandy Garden Dragonfly Wishes

It was also the first public outing for my Mini Stampin’ Cut & Emboss Machine, nicknamed Little Roland. This fits the Greenery Embossing Folders perfectly and is more than adequate for the vast majority of our dies, including the Stitched Nested Labels Dies I’ve used here.

Stampin Up Dandy Garden Dragonfly Wishes

Little Roland and the Dandy Garden Suite all go live tomorrow with the launch of the January-June Mini Catalogue, which is when Sale-a-Bration goes live, too!

Here are some tips for shopping wisely:

Stampin Up Dandy Garden Dragonfly Wishes

The Blending Brushes give you a soft, natural-looking background which offsets these images perfectly. The wildflower image requires very little colouring, so giving it a hint of a background allows the image to stand out.

Stampin Up Dandy Garden Dragonfly Wishes