Friday, 28 February 2014

NEW: Hip Hip Hooray Card Kit


Do you…

…struggle to find time to make cards?
…want to start making cards but don’t know how to begin or think it’s going to be expensive?
…love cool new products and word stamps?
…know someone who fits any of the above?

The solution to all the above can be found in our fabulous new Hip Hip Hooray Card Kit. The kit allows you to make 20 cards at less than £1 each… you can’t buy fabulous cards like this at that price! Just £17.95 will get you the following:

  • Cardstock for 20 cards
  • Clear stamp block
  • Stampin’ Dimensionals
  • Twine 
  • Clips
  • Basic Gray Stampin’ Spot (1” square ink pad)
  • Envelopes for 20 cards
  • Hip Hip Hooray stamp set (three stamps)
  • Adhesive die-cut embellishments
  • Full colour instruction brochure


Pretty amazing, eh? Whether you’re a complete beginner or experienced crafter, I think you’ll love this product. I can’t wait to order mine!

Hip Hip Hooray Card Kit - 134998 - £17.95
Read More »


Do you…

…struggle to find time to make cards?
…want to start making cards but don’t know how to begin or think it’s going to be expensive?
…love cool new products and word stamps?
…know someone who fits any of the above?

The solution to all the above can be found in our fabulous new Hip Hip Hooray Card Kit. The kit allows you to make 20 cards at less than £1 each… you can’t buy fabulous cards like this at that price! Just £17.95 will get you the following:

  • Cardstock for 20 cards
  • Clear stamp block
  • Stampin’ Dimensionals
  • Twine 
  • Clips
  • Basic Gray Stampin’ Spot (1” square ink pad)
  • Envelopes for 20 cards
  • Hip Hip Hooray stamp set (three stamps)
  • Adhesive die-cut embellishments
  • Full colour instruction brochure


Pretty amazing, eh? Whether you’re a complete beginner or experienced crafter, I think you’ll love this product. I can’t wait to order mine!

Hip Hip Hooray Card Kit - 134998 - £17.95

Thursday, 27 February 2014

Come to my mini album class


Today is a reminder that time is running out to sign up for my Mini Album class on Saturday, 15th March. Everyone who attends this class will get a Mini Memories Simply Created Album Kit, plus a few other additions to pretty it up even more. 

In an afternoon, you’ll complete your album… or at least get it almost finished! You’ll need to bring photos along to add, then it’s just a case of arranging all the beautiful supplies in a pleasing order. This is really casual scrapbooking, and all the pieces go together beautifully, so no need to sweat about what goes where. I’m the world’s slowest scrapbooker so if I can do this in an afternoon - and I have done - then you can too!

The completed album would make the perfect gift for Mother’s Day. Fill it with pictures of your children, or of you and your siblings as children… or of family members, a holiday or special occasion. Whatever you do to your album, it’s sure to be gorgeous as the kit is so well put together. 

Don’t worry too much about the photos - as it’s a casual album, I printed mine on the computer, using good quality paper, and it looks absolutely fine. Unfortunately I’m not organised enough to have taken any photos of my project so you’ll have to wait to see it at the class. 

I have places left for this class but I need to know ASAP please, so that I have time to order the kits. Please find out more about this fun events by clicking HERE. And don’t forget to tell your friends! 

Been to a class before? Bring a friend who hasn’t and you’ll get a £5 gift voucher!

Not been to one of my classes before? Come along and you’ll get a welcome pack!

Read More »


Today is a reminder that time is running out to sign up for my Mini Album class on Saturday, 15th March. Everyone who attends this class will get a Mini Memories Simply Created Album Kit, plus a few other additions to pretty it up even more. 

In an afternoon, you’ll complete your album… or at least get it almost finished! You’ll need to bring photos along to add, then it’s just a case of arranging all the beautiful supplies in a pleasing order. This is really casual scrapbooking, and all the pieces go together beautifully, so no need to sweat about what goes where. I’m the world’s slowest scrapbooker so if I can do this in an afternoon - and I have done - then you can too!

The completed album would make the perfect gift for Mother’s Day. Fill it with pictures of your children, or of you and your siblings as children… or of family members, a holiday or special occasion. Whatever you do to your album, it’s sure to be gorgeous as the kit is so well put together. 

Don’t worry too much about the photos - as it’s a casual album, I printed mine on the computer, using good quality paper, and it looks absolutely fine. Unfortunately I’m not organised enough to have taken any photos of my project so you’ll have to wait to see it at the class. 

I have places left for this class but I need to know ASAP please, so that I have time to order the kits. Please find out more about this fun events by clicking HERE. And don’t forget to tell your friends! 

Been to a class before? Bring a friend who hasn’t and you’ll get a £5 gift voucher!

Not been to one of my classes before? Come along and you’ll get a welcome pack!

Tuesday, 25 February 2014

Perfect Blend of stamps and paper


Two very slightly different versions of the same card today. 

The first is made with Epic Day DSP, while the second uses the new Retro Fresh DSP. As much as I love the new Retro Fresh suite, I have to say that I think the Epic Day paper works best with this card as it even has the coffee rings on it. Not that you couldn’t make those using a circular Framelits die as a stamp!


The Perfect Blend stamp set and Gorgeous Grunge are just made for each other. I had fun adding lots of coffee splatters! The coffee cup lends itself well to the paper piecing technique; I simply stamped it on Very Vanilla cardstock, then again on the DSP and again on Baked Brown Sugar cardstock, cut the latter two out and stuck on top. The sketched nature of the image means you don’t have to worry too much about being precise, which is ideal for me!

The top card has a matching envelope, made with the marvellous Envelope Punch Board. Do you have this amazing tool yet?

Stamps: Perfect Blend, Gorgeous Grunge
Cardstock: Baked Brown Sugar, Very Vanilla
Paper: Epic Day (top), Retro Fresh (bottom) 
Ink: Early Espresso, Crisp Cantaloupe, Crumb Cake
Accessories: Ruffled Ribbon - Baked Brown Sugar, Word Bubbles Framelits, Corner Rounder
Read More »


Two very slightly different versions of the same card today. 

The first is made with Epic Day DSP, while the second uses the new Retro Fresh DSP. As much as I love the new Retro Fresh suite, I have to say that I think the Epic Day paper works best with this card as it even has the coffee rings on it. Not that you couldn’t make those using a circular Framelits die as a stamp!


The Perfect Blend stamp set and Gorgeous Grunge are just made for each other. I had fun adding lots of coffee splatters! The coffee cup lends itself well to the paper piecing technique; I simply stamped it on Very Vanilla cardstock, then again on the DSP and again on Baked Brown Sugar cardstock, cut the latter two out and stuck on top. The sketched nature of the image means you don’t have to worry too much about being precise, which is ideal for me!

The top card has a matching envelope, made with the marvellous Envelope Punch Board. Do you have this amazing tool yet?

Stamps: Perfect Blend, Gorgeous Grunge
Cardstock: Baked Brown Sugar, Very Vanilla
Paper: Epic Day (top), Retro Fresh (bottom) 
Ink: Early Espresso, Crisp Cantaloupe, Crumb Cake
Accessories: Ruffled Ribbon - Baked Brown Sugar, Word Bubbles Framelits, Corner Rounder

Monday, 24 February 2014

My Digital Monday - spaghetti page


I’m still training myself up in My Digital Studio, using other people’s projects as inspiration. Here I’ve copied a page I found on MyDigitalStudio.net, although there was one aspect which I couldn’t quite work out how to do; how did she tilt the main image within the rounded corner box?

I did purchase a banner punch for this project but now I’m not sure if it was there already, as I found a whole new section of punches I didn’t know about! It was only 65p so I’m not losing sleep over it. 


I haven’t put a date on this yet because I haven’t worked it out. The photo says January 2009 but that’s not accurate as it was taken on holiday in the Lake District and we’ve never been in winter. 

Read More »


I’m still training myself up in My Digital Studio, using other people’s projects as inspiration. Here I’ve copied a page I found on MyDigitalStudio.net, although there was one aspect which I couldn’t quite work out how to do; how did she tilt the main image within the rounded corner box?

I did purchase a banner punch for this project but now I’m not sure if it was there already, as I found a whole new section of punches I didn’t know about! It was only 65p so I’m not losing sleep over it. 


I haven’t put a date on this yet because I haven’t worked it out. The photo says January 2009 but that’s not accurate as it was taken on holiday in the Lake District and we’ve never been in winter. 

Saturday, 22 February 2014

Caturday - Lulu


Sorry that Caturday is so late today; I’ve been out for a long walk today, training myself up for the 10-miler I’ve signed up for! I and several of my Stampin’ Up!® team members will be completing the Pink Ribbonwalk for Breast Cancer Care at Chatsworth Park in June. 10 miles is few miles out of my comfort zone so I’ve been trying to get out walking as much as I can, to build up my stamina!

You are, of course, more than welcome to sponsor me in my endeavours. It’s a very worthy cause and you can read more at my Just Giving page here. I and Breast Cancer Care would be very grateful!

Today’s Caturday star is Lulu, who has just arrived at Woodland Nook cat shelter all the way from Crete. She seems to have settled in well and is now looking for a permanent home.
Read More »


Sorry that Caturday is so late today; I’ve been out for a long walk today, training myself up for the 10-miler I’ve signed up for! I and several of my Stampin’ Up!® team members will be completing the Pink Ribbonwalk for Breast Cancer Care at Chatsworth Park in June. 10 miles is few miles out of my comfort zone so I’ve been trying to get out walking as much as I can, to build up my stamina!

You are, of course, more than welcome to sponsor me in my endeavours. It’s a very worthy cause and you can read more at my Just Giving page here. I and Breast Cancer Care would be very grateful!

Today’s Caturday star is Lulu, who has just arrived at Woodland Nook cat shelter all the way from Crete. She seems to have settled in well and is now looking for a permanent home.

Tuesday, 18 February 2014

Thinking outside of the box with Twisty Treats kit


I know that some seasoned crafters often overlook our kits as they believe them to be just for beginners, but I disagree. I think there’s a lot of fun to be had from a kit, with a little imagination. This box is just one example. 

Take a look at the Twisty Treats kit from the Sale-a-Bration catalogue. It contains 12 polka dot cellophane bags, which are really cool, as well as 12 printed twist ties, 12 die-cut tags and a sheet of self-adhesive die-cut gliittered hearts. Put them together in the traditional manner and you end up with something like this:


But I wanted to show the ladies at my most recent Stampin’ Up!® party something a little different, so decided to think outside of the box, quite literally, and came up with the project at the top of the page. 

To create it, I made a little box to go inside the bag; this makes the polka dots on the cellophane bags show up much better. I made a tag to go with it, showcasing the In Colors and some new Spring/Summer catalogue products. 

Stamps: Just Sayin, Petal Parade
Cardstock: Calypso Coral (I used Crisp Cantaloupe on the night), Pistachio Pudding, Whisper White
Ink: Coastal Cabana, Crisp Cantaloupe
Accessories: Twisty Treats kit (SAB),  Ruffled Ribbon - Coastal Cabana, Wooden Elements, Fringe Scissors, Word Bubbles Framelits

I repeated this project for Crafty Friday last week, adapting the design for Valentine’s Day. This is what we made – it’s a little more complicated in that the front panel was cut away so we could add a new panel with the heart aperture. If we hadn’t created a new panel, the punched heart would have been upside-down! 


Stamps: Language of Love
Cardstock: Primrose Petals Core’dinations, Raspberry Ripple, Pistachio Pudding, Very Vanilla, Silver Glimmer Paper
Ink: Primrose Petals, Raspberry Ripple
Accessories: Twisty Treats Kit (SAB), Fringe Scissors, Large Heart Punch, Small Heart Punch

Finally, here are the measurements for the box:
  1. You’ll need a piece of cardstock measuring 28cm x 12cm
  2. Score along the length, 5cm from the edge
  3. Turn your cardstock 90º and score at 5cm, 13cm, 18cm and 26cm
  4. Fold along all the score lines and cut away the smallest section, then assemble as normal
  5. The finished box should slide neatly into the cellophane bag.


Read More »

I know that some seasoned crafters often overlook our kits as they believe them to be just for beginners, but I disagree. I think there’s a lot of fun to be had from a kit, with a little imagination. This box is just one example. 

Take a look at the Twisty Treats kit from the Sale-a-Bration catalogue. It contains 12 polka dot cellophane bags, which are really cool, as well as 12 printed twist ties, 12 die-cut tags and a sheet of self-adhesive die-cut gliittered hearts. Put them together in the traditional manner and you end up with something like this:


But I wanted to show the ladies at my most recent Stampin’ Up!® party something a little different, so decided to think outside of the box, quite literally, and came up with the project at the top of the page. 

To create it, I made a little box to go inside the bag; this makes the polka dots on the cellophane bags show up much better. I made a tag to go with it, showcasing the In Colors and some new Spring/Summer catalogue products. 

Stamps: Just Sayin, Petal Parade
Cardstock: Calypso Coral (I used Crisp Cantaloupe on the night), Pistachio Pudding, Whisper White
Ink: Coastal Cabana, Crisp Cantaloupe
Accessories: Twisty Treats kit (SAB),  Ruffled Ribbon - Coastal Cabana, Wooden Elements, Fringe Scissors, Word Bubbles Framelits

I repeated this project for Crafty Friday last week, adapting the design for Valentine’s Day. This is what we made – it’s a little more complicated in that the front panel was cut away so we could add a new panel with the heart aperture. If we hadn’t created a new panel, the punched heart would have been upside-down! 


Stamps: Language of Love
Cardstock: Primrose Petals Core’dinations, Raspberry Ripple, Pistachio Pudding, Very Vanilla, Silver Glimmer Paper
Ink: Primrose Petals, Raspberry Ripple
Accessories: Twisty Treats Kit (SAB), Fringe Scissors, Large Heart Punch, Small Heart Punch

Finally, here are the measurements for the box:
  1. You’ll need a piece of cardstock measuring 28cm x 12cm
  2. Score along the length, 5cm from the edge
  3. Turn your cardstock 90º and score at 5cm, 13cm, 18cm and 26cm
  4. Fold along all the score lines and cut away the smallest section, then assemble as normal
  5. The finished box should slide neatly into the cellophane bag.


Monday, 17 February 2014

MDS Selfies scrapbook page


This digital scrapbook page was sooooooo quick and easy to create. This time I learned how to line up pictures, creating a sense of order that I always find so difficult to achieve in “real”, paper scrapbooking. 

For the page, I started with a Basic Black background, then added one of my favourite Vintage Overlays, a stamp from the Autumn Elements set and a couple of splatters. Pictures, title, journalling… done. 


Supplies: My Digital Studio, basic version, no add-ons
Read More »


This digital scrapbook page was sooooooo quick and easy to create. This time I learned how to line up pictures, creating a sense of order that I always find so difficult to achieve in “real”, paper scrapbooking. 

For the page, I started with a Basic Black background, then added one of my favourite Vintage Overlays, a stamp from the Autumn Elements set and a couple of splatters. Pictures, title, journalling… done. 


Supplies: My Digital Studio, basic version, no add-ons

Sunday, 16 February 2014

Fringe Flowers


Did you get any flowers for Valentine’s Day? If not, why not make yourself some? These are made using our new Fringe Scissors, which are great fun. 

To make them, I took a strip of cardstock, the length of A4 and about 1” wide, then laid Sticky Strip along the length. Next I used the Fringe Scissors to cut up as far as the tape (the tape is really useful as it gives you a line to follow) all the way along the strip of cardstock. 

Finally, wrap the cardstock around some florist’s wire and you’re done. 

To vary it, you can do a shorter strip in the centre of the flower; here I used Calypso Coral, cut shorter, inside Pink Pirouette. 

I’ve wrapped the flowers in some tissue paper and then cut up one of our new spotty cello bags from the Twisty Treats Sale-a-Bration kit. 

Cardstock: Pink Pirouette, Calypso Coral, Pool Party, Pear Pizzazz
Accessories: Fringe Scissors, Twisty Treats Kit (SAB)
Read More »


Did you get any flowers for Valentine’s Day? If not, why not make yourself some? These are made using our new Fringe Scissors, which are great fun. 

To make them, I took a strip of cardstock, the length of A4 and about 1” wide, then laid Sticky Strip along the length. Next I used the Fringe Scissors to cut up as far as the tape (the tape is really useful as it gives you a line to follow) all the way along the strip of cardstock. 

Finally, wrap the cardstock around some florist’s wire and you’re done. 

To vary it, you can do a shorter strip in the centre of the flower; here I used Calypso Coral, cut shorter, inside Pink Pirouette. 

I’ve wrapped the flowers in some tissue paper and then cut up one of our new spotty cello bags from the Twisty Treats Sale-a-Bration kit. 

Cardstock: Pink Pirouette, Calypso Coral, Pool Party, Pear Pizzazz
Accessories: Fringe Scissors, Twisty Treats Kit (SAB)

Saturday, 15 February 2014

Caturday - Rufus


Last weekend saw a new arrival at the cat shelter - this gorgeous little ginger boy. He’d been found wandering and filthy around Swanwick and was brought into safety.  Initially his microchip couldn’t be found but he settled in well to the shelter, demanding LOTS of cuddles.

Fortunately, a second scan revealed his chip. His name was Rufus and he was soon reunited with his owner. Happy endings all round – and a reminder that microchipping can save a lot of heartache!

Read More »

Last weekend saw a new arrival at the cat shelter - this gorgeous little ginger boy. He’d been found wandering and filthy around Swanwick and was brought into safety.  Initially his microchip couldn’t be found but he settled in well to the shelter, demanding LOTS of cuddles.

Fortunately, a second scan revealed his chip. His name was Rufus and he was soon reunited with his owner. Happy endings all round – and a reminder that microchipping can save a lot of heartache!

Thursday, 13 February 2014

Language of Love Valentine's cards


What a difference a day makes! After last night’s scary storm (I thought the roof was going to blow off at work), today it is positively spring-like. Don’t get used to it...

Meanwhile, it’s Valentine’s Day tomorrow and have you made a card for your loved one? Here’s one I made with the new Language of Love stamp set, which we were given at Convention. I love the cleanliness and simplicity of it - and especially the new Wooden Elements.  This set goes with several punches which you may have already, so it’s worth a look!

Language is Love is in the Spring/Summer catalogue so available until the end of June. But time is running out to get your hands on the fab products in the Whole Lot of Love promotion - they aren’t just for Valentine’s Day! Take a look here

I’m really into clean white background at the moment so these note cards and envelopes are getting a lot of use. They are a very quick way of making cards, a nice size and now in heavier Whisper White cardstock, too. 

Stamps: Language of Love
Cardstock: Whisper White note cards, Whisper White, Very Vanilla, Primrose Petals
Ink: Blushing Bride, Primrose Petals

Accessories: Small heart punch, large heart punch, Wooden Elements, Paper Doilies
Read More »

What a difference a day makes! After last night’s scary storm (I thought the roof was going to blow off at work), today it is positively spring-like. Don’t get used to it...

Meanwhile, it’s Valentine’s Day tomorrow and have you made a card for your loved one? Here’s one I made with the new Language of Love stamp set, which we were given at Convention. I love the cleanliness and simplicity of it - and especially the new Wooden Elements.  This set goes with several punches which you may have already, so it’s worth a look!

Language is Love is in the Spring/Summer catalogue so available until the end of June. But time is running out to get your hands on the fab products in the Whole Lot of Love promotion - they aren’t just for Valentine’s Day! Take a look here

I’m really into clean white background at the moment so these note cards and envelopes are getting a lot of use. They are a very quick way of making cards, a nice size and now in heavier Whisper White cardstock, too. 

Stamps: Language of Love
Cardstock: Whisper White note cards, Whisper White, Very Vanilla, Primrose Petals
Ink: Blushing Bride, Primrose Petals

Accessories: Small heart punch, large heart punch, Wooden Elements, Paper Doilies

Tuesday, 11 February 2014

Springtime Hello tag


Well, it’s raining again but we can’t really complain in Derbyshire. I hope everyone reading who lives in a flood-risk area is staying safe. Although, I suppose if you’ve been flooded, the last thing you’ll be doing is blog-hopping...

Have you seen the new Spring/Summer catalogue yet? It’s very lovely and packed with wonderful new products for lots of different styles of crafter. 

As well as the funky, funny and bang-on-trend speech bubbles, there’s this far more traditional stamp set, which I love just as much. Little flowers and a bee, all suitable for colouring in (but not too difficult) are about as far from those cheeky speech bubbles as you can get. See what I mean about there being something to suit different styles? 

I made this cute little tag at a crafting day with some friends. I had limited supplies with me, which really focuses the mind! To create the tag, I simply cut a triangle off a corner of cardstock, flipped the triangle over and used it as a guide to snip off the opposite corner. The image is coloured with markers - if I remember correctly, it’s Crisp Cantaloupe and Wild Wasabi but I could be wrong. 

Don’t forget, if you spend £45 on any products – from the Spring/Summer and annual catalogues, as well as on My Digital Studio downloads – you will qualify for a FREE Sale-a-Bration item. In the SAB brochure, we have stamps, DSP, accessories, MDS downloads and more. Click the banner at the top of the page, or here, for more details. 

Stamps: Springtime Hello
Cardstock: Baked Brown Sugar, Very Vanilla
Ink: Gumball Green plus markers

Accessories: Linen Thread, Ruffled Ribbon - Baked Brown Sugar, Paper Doilies
Read More »


Well, it’s raining again but we can’t really complain in Derbyshire. I hope everyone reading who lives in a flood-risk area is staying safe. Although, I suppose if you’ve been flooded, the last thing you’ll be doing is blog-hopping...

Have you seen the new Spring/Summer catalogue yet? It’s very lovely and packed with wonderful new products for lots of different styles of crafter. 

As well as the funky, funny and bang-on-trend speech bubbles, there’s this far more traditional stamp set, which I love just as much. Little flowers and a bee, all suitable for colouring in (but not too difficult) are about as far from those cheeky speech bubbles as you can get. See what I mean about there being something to suit different styles? 

I made this cute little tag at a crafting day with some friends. I had limited supplies with me, which really focuses the mind! To create the tag, I simply cut a triangle off a corner of cardstock, flipped the triangle over and used it as a guide to snip off the opposite corner. The image is coloured with markers - if I remember correctly, it’s Crisp Cantaloupe and Wild Wasabi but I could be wrong. 

Don’t forget, if you spend £45 on any products – from the Spring/Summer and annual catalogues, as well as on My Digital Studio downloads – you will qualify for a FREE Sale-a-Bration item. In the SAB brochure, we have stamps, DSP, accessories, MDS downloads and more. Click the banner at the top of the page, or here, for more details. 

Stamps: Springtime Hello
Cardstock: Baked Brown Sugar, Very Vanilla
Ink: Gumball Green plus markers

Accessories: Linen Thread, Ruffled Ribbon - Baked Brown Sugar, Paper Doilies

Monday, 10 February 2014

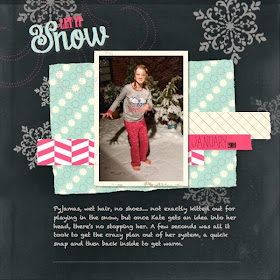
MDS chalkboard effect snow scrapbook page


I have another digital creation for you today. I am totally in love with My Digital Studio, which makes scrapbooking so easy. I still love playing with paper but I em enjoying the freedom that digital scrapping brings, as you can move things around again and again with no fear of ruining the photo! It’s also encouraging me to scrap more photos. Instead of just the “best” images, I am happily scrapbooking the everyday, which has to be a good thing, doesn’t it?

These everyday snaps cry out to be explained, so this time there was no excuse for forgetting the journalling! After all, what self-respecting mother would allow her daughter outside in the snow with bare feet and wet hair? I assure you that no children were harmed in the making of this scrapbook page, and the daughter suffered no ill-effects from her brief foray into the cold. 

In my efforts to teach myself how to use My Digital Studio (and it really is easy to learn), I am CASEing other people’s scrapbook pages. This is really helpful because rather than sitting here thinking “I wonder if…”, I challenge myself to find out “how” instead. 

This was a CASE of  this page by Heather Summers. I learned how to produce the effect of a torn edge and also how to recolour a piece of Designer Series Paper. I created the chalkboard effect by starting with a Basic Black background and adding a vintage overlay in Whisper White, with the opacity significantly reduced to make it less harsh. The fonts were downloaded from the web; just search “free chalkboard fonts” and you’ll discover rich pickings!
Read More »


I have another digital creation for you today. I am totally in love with My Digital Studio, which makes scrapbooking so easy. I still love playing with paper but I em enjoying the freedom that digital scrapping brings, as you can move things around again and again with no fear of ruining the photo! It’s also encouraging me to scrap more photos. Instead of just the “best” images, I am happily scrapbooking the everyday, which has to be a good thing, doesn’t it?

These everyday snaps cry out to be explained, so this time there was no excuse for forgetting the journalling! After all, what self-respecting mother would allow her daughter outside in the snow with bare feet and wet hair? I assure you that no children were harmed in the making of this scrapbook page, and the daughter suffered no ill-effects from her brief foray into the cold. 

In my efforts to teach myself how to use My Digital Studio (and it really is easy to learn), I am CASEing other people’s scrapbook pages. This is really helpful because rather than sitting here thinking “I wonder if…”, I challenge myself to find out “how” instead. 

This was a CASE of  this page by Heather Summers. I learned how to produce the effect of a torn edge and also how to recolour a piece of Designer Series Paper. I created the chalkboard effect by starting with a Basic Black background and adding a vintage overlay in Whisper White, with the opacity significantly reduced to make it less harsh. The fonts were downloaded from the web; just search “free chalkboard fonts” and you’ll discover rich pickings!

Sunday, 9 February 2014

Just Sayin' gets the grunge treatment


Sometimes when I get my hands on new products, my mind goes completely blank, so I turn to one of many sources of inspiration. This can be the SU catalogues, blogs, Pinterest or swaps I’ve received at Stampin’ Up! events. 

Demonstrators who went to last year’s Convention may recognise this card as a CASE of one of the Make & Takes. I’d been itching to get my hands on Gorgeous Grunge for ages (but I knew we were getting it at Convention so resisted buying!). I don’t have a pic of the card but it was on loads of demonstrator blogs, both here and abroad, last year so take a look at this one. 

It’s the perfect design to adapt to the new Spring/Summer catalogue products. Almost exactly the same but with a Just Sayin’ image as the focal point, some brand new Retro Fresh washi tape and a wooden heart instead of the button. 

Stamps: Just Sayin, Gorgeous Grunge
Cardstock: Coastal Cabana, Whisper White, Pool Party Core’dinations, Silver Glimmer Paper
Ink: Crisp Cantaloupe, Pool Party, So Saffon

Accessories: Wooden Elements, Word Bubbles Framelits, Retro Fresh Washi Tape
Read More »


Sometimes when I get my hands on new products, my mind goes completely blank, so I turn to one of many sources of inspiration. This can be the SU catalogues, blogs, Pinterest or swaps I’ve received at Stampin’ Up! events. 

Demonstrators who went to last year’s Convention may recognise this card as a CASE of one of the Make & Takes. I’d been itching to get my hands on Gorgeous Grunge for ages (but I knew we were getting it at Convention so resisted buying!). I don’t have a pic of the card but it was on loads of demonstrator blogs, both here and abroad, last year so take a look at this one. 

It’s the perfect design to adapt to the new Spring/Summer catalogue products. Almost exactly the same but with a Just Sayin’ image as the focal point, some brand new Retro Fresh washi tape and a wooden heart instead of the button. 

Stamps: Just Sayin, Gorgeous Grunge
Cardstock: Coastal Cabana, Whisper White, Pool Party Core’dinations, Silver Glimmer Paper
Ink: Crisp Cantaloupe, Pool Party, So Saffon

Accessories: Wooden Elements, Word Bubbles Framelits, Retro Fresh Washi Tape

Saturday, 8 February 2014

Caturday - Pumpkin


We have a new cat called Pumpkin at Woodland Nook cat shelter. And isn’t he a beauty? He arrived with his brother, Thomas, and their companion, Jasper – a handsome beast who has already been rehomed.

Pumpkin was still very nervous last weekend when I saw him, but daughter reports that he’s now affectionate and friendly, with the softest of soft fur. Tempted?
Read More »


We have a new cat called Pumpkin at Woodland Nook cat shelter. And isn’t he a beauty? He arrived with his brother, Thomas, and their companion, Jasper – a handsome beast who has already been rehomed.

Pumpkin was still very nervous last weekend when I saw him, but daughter reports that he’s now affectionate and friendly, with the softest of soft fur. Tempted?

Friday, 7 February 2014

Gorgeous Grunge with Retro Fresh


This card is inspired - well, CASEd in fact - from a Convention swap I received from the very talented Kim Fee. Her card (below) was one of my favourite swaps, so we decided to CASE it at a recent Crafty Friday. 


I was running short of Epic Day washi tape, however, so used the opportunity to make something with my brand new Spring/Summer catalogue products. I swapped the washi for Retro Fresh and adjusted the colours accordingly. Instead of the small scalloped circle, I used one of the fabulous wooden elements and, because I don’t actually own that little star punch (just borrow it a lot), I used the small heart instead. The glimmer paper is sprayed with Early Espresso and Coastal Cabana inks (long story) to make it a lovely platinum. I used this purely because I couldn’t find any other, although I think Champagne Glimmer would probably look the best with this colour scheme. 

Stamps: Gorgeous Grunge, Sweet Essentials
Cardstock: Baked Brown Sugar, Coastal Cabana, Very Vanilla, Tangerine Tango
Ink: Baked Brown Sugar, Tangerine Tango
Accessories: Retro Fresh Washi Tape, Linen Thread, Essentials Wooden Elements, 3/4” circle punch, small heart punch, Silver Glimmer paper, Basic Rhinestones
Read More »

This card is inspired - well, CASEd in fact - from a Convention swap I received from the very talented Kim Fee. Her card (below) was one of my favourite swaps, so we decided to CASE it at a recent Crafty Friday. 


I was running short of Epic Day washi tape, however, so used the opportunity to make something with my brand new Spring/Summer catalogue products. I swapped the washi for Retro Fresh and adjusted the colours accordingly. Instead of the small scalloped circle, I used one of the fabulous wooden elements and, because I don’t actually own that little star punch (just borrow it a lot), I used the small heart instead. The glimmer paper is sprayed with Early Espresso and Coastal Cabana inks (long story) to make it a lovely platinum. I used this purely because I couldn’t find any other, although I think Champagne Glimmer would probably look the best with this colour scheme. 

Stamps: Gorgeous Grunge, Sweet Essentials
Cardstock: Baked Brown Sugar, Coastal Cabana, Very Vanilla, Tangerine Tango
Ink: Baked Brown Sugar, Tangerine Tango
Accessories: Retro Fresh Washi Tape, Linen Thread, Essentials Wooden Elements, 3/4” circle punch, small heart punch, Silver Glimmer paper, Basic Rhinestones

Thursday, 6 February 2014

Springtime Hello canvas


I love this tiny little stamp set, which is odd for me as small stamps usually get on my nerves. But I do love a bee image, so I suppose it was bound to be a winner. It’s only £9.95 for the clear-mount version, which is a bargain. I am considering holding a class using this stamp set, and including it in the price; do let me know – either by commenting or by emailing me – if you’re interested. 

Here I’ve stamped on a tiny canvas (four for £1 from the Pound Shop!) and finished off with some ruffled ribbon and rhinestones. 

Stamping in the canvas wasn’t as straightforward as it sounds, though, and two canvases were wasted in the process, so here are my tips:

  • Place a clear block behind the canvas to create a solid surface
  • Use Black Stazon
  • Don’t expect perfection - the use of the ruffled ribbon arose from the fact that the image didn’t quite reach the bottom, because of the differing levels.
Stamps: Springtime Hello
Ink: Black Stazon, markers - Pool Party, Daffodil Delight, Gumball Green
Accessories: Ruffle Stretch Ribbon - Baked Brown Sugar, Basic Rhinestones
Other: Mini canvas, mini easel

Read More »


I love this tiny little stamp set, which is odd for me as small stamps usually get on my nerves. But I do love a bee image, so I suppose it was bound to be a winner. It’s only £9.95 for the clear-mount version, which is a bargain. I am considering holding a class using this stamp set, and including it in the price; do let me know – either by commenting or by emailing me – if you’re interested. 

Here I’ve stamped on a tiny canvas (four for £1 from the Pound Shop!) and finished off with some ruffled ribbon and rhinestones. 

Stamping in the canvas wasn’t as straightforward as it sounds, though, and two canvases were wasted in the process, so here are my tips:

  • Place a clear block behind the canvas to create a solid surface
  • Use Black Stazon
  • Don’t expect perfection - the use of the ruffled ribbon arose from the fact that the image didn’t quite reach the bottom, because of the differing levels.
Stamps: Springtime Hello
Ink: Black Stazon, markers - Pool Party, Daffodil Delight, Gumball Green
Accessories: Ruffle Stretch Ribbon - Baked Brown Sugar, Basic Rhinestones
Other: Mini canvas, mini easel

Tuesday, 4 February 2014

Starburst Technique with See Ya Later stamp set


This cheerful card was one of the demonstrations at my Launch Party at the weekend. It shows two new products and a fun technique. 

The main new product that you’ll notice right away is the See Ya Later stamp set from the Sale-a-Bration brochure, which has really fun images and words. I stamped this in Smoky Slate. 

The second new product on there is the cloud die. But hold on, we don’t have a cloud die, do we? Well yes we do if you use the thought bubble from the Word Bubbles Framelits. I cut these out using Vellum cardstock, to represent the wispy nature of clouds. They are stuck down with SNAIL, secured only behind the main image so that it doesn’t show through - it makes them look a bit more like they’re “floating” too, I think. Or am I just deluded?

Now for the technique. It’s called the Starburst Technique and it’s fun to do. There are lots of variations you can try, too. I could go into a long explanation or take dozens of photos to illustrate the technique, but this video from Stampin’ Up!® explains it brilliantly, so why reinvent the wheel?


After creating my paper mask, instead of spritzing, as Carrie does in the video, I sponged Daffodil Delight ink onto the cardstock, concentrating my efforts nearer to the centre and gradually easing off as I reached the edges of the card. To hold the mask in place, I used tiny dabs of Tombow adhesive on the back of my mask, allowing it to dry clear – this turns it into a temporary adhesive so the mask can be removed. 

I love this effect and hope you try it! 

Stamps: See Ya Later (SAB)
Cardstock: Daffodil Delight, Whisper White, Vellum Cardstock
Ink: Daffodil Delight, Smoky Slate

Accessories: Word Bubbles Framelits, Sponge Daubers
Read More »

This cheerful card was one of the demonstrations at my Launch Party at the weekend. It shows two new products and a fun technique. 

The main new product that you’ll notice right away is the See Ya Later stamp set from the Sale-a-Bration brochure, which has really fun images and words. I stamped this in Smoky Slate. 

The second new product on there is the cloud die. But hold on, we don’t have a cloud die, do we? Well yes we do if you use the thought bubble from the Word Bubbles Framelits. I cut these out using Vellum cardstock, to represent the wispy nature of clouds. They are stuck down with SNAIL, secured only behind the main image so that it doesn’t show through - it makes them look a bit more like they’re “floating” too, I think. Or am I just deluded?

Now for the technique. It’s called the Starburst Technique and it’s fun to do. There are lots of variations you can try, too. I could go into a long explanation or take dozens of photos to illustrate the technique, but this video from Stampin’ Up!® explains it brilliantly, so why reinvent the wheel?


After creating my paper mask, instead of spritzing, as Carrie does in the video, I sponged Daffodil Delight ink onto the cardstock, concentrating my efforts nearer to the centre and gradually easing off as I reached the edges of the card. To hold the mask in place, I used tiny dabs of Tombow adhesive on the back of my mask, allowing it to dry clear – this turns it into a temporary adhesive so the mask can be removed. 

I love this effect and hope you try it! 

Stamps: See Ya Later (SAB)
Cardstock: Daffodil Delight, Whisper White, Vellum Cardstock
Ink: Daffodil Delight, Smoky Slate

Accessories: Word Bubbles Framelits, Sponge Daubers

Sunday, 2 February 2014

See Ya Later Sale-a-Bration stamp set


Happy February! Let’s hope it’s a bit drier and less windy than January. 

First of all, a big thank you to everyone who came along to my Launch Party yesterday. It was great to see everyone and we had a relaxing time eating cake, making cards and chatting about the fab new products in the Spring/Summer catalogue and Sale-a-Bration. 

Secondly, what do you think of my new-look blog? I’ve been working on it behind the scenes for a while but yesterday decided I may as well just roll out the changes, even if I still have some little bits I’d like to tweak. 

I made the background, header and buttons in My Digital Studio, with the addition of a free downloaded font and a secret bit of clipart which I’m sure you’ll spot! The blog background came out darker than I’d hoped but I’m sure we’ll get used to it. Let me know if you have trouble loading the page - if it’s an issue, I can remove the background to speed things up a bit. 

So, today’s project features a bit of February sunshine to give the weather some encouragement to stay nice! I made this card using the new Banner Punch from Stampin’ Up!® It’s a Sale-a-Bration item which means you can earn it FREE with a £45 purchase. That’s pretty cool as everyone loves freebies!

There’s a stamp set to match, too, which I showed you on this card. But here I’ve used it to make some funky sun rays behind this very cheery greeting. The clouds are made using the Word Bubbles Framelits dies, which co-ordinate with the Just Sayin’ stamp set. They’re actually thought bubbles but make perfect clouds. This set of dies was one of the products I demoed at my Launch Party - but I still haven’t photographed all the projects, so they will just have to wait I’m afraid. 

Stamps: See Ya Later
Cardstock: Soft Sky, Coastal Cabana, Daffodil Delight, Whisper White
Ink: Daffodil Delight
Accessories: 2 1/2” circle punch, Banner Punch, Word Bubbles dies, Soft Sky Seam-binding ribbon

Read More »

Happy February! Let’s hope it’s a bit drier and less windy than January. 

First of all, a big thank you to everyone who came along to my Launch Party yesterday. It was great to see everyone and we had a relaxing time eating cake, making cards and chatting about the fab new products in the Spring/Summer catalogue and Sale-a-Bration. 

Secondly, what do you think of my new-look blog? I’ve been working on it behind the scenes for a while but yesterday decided I may as well just roll out the changes, even if I still have some little bits I’d like to tweak. 

I made the background, header and buttons in My Digital Studio, with the addition of a free downloaded font and a secret bit of clipart which I’m sure you’ll spot! The blog background came out darker than I’d hoped but I’m sure we’ll get used to it. Let me know if you have trouble loading the page - if it’s an issue, I can remove the background to speed things up a bit. 

So, today’s project features a bit of February sunshine to give the weather some encouragement to stay nice! I made this card using the new Banner Punch from Stampin’ Up!® It’s a Sale-a-Bration item which means you can earn it FREE with a £45 purchase. That’s pretty cool as everyone loves freebies!

There’s a stamp set to match, too, which I showed you on this card. But here I’ve used it to make some funky sun rays behind this very cheery greeting. The clouds are made using the Word Bubbles Framelits dies, which co-ordinate with the Just Sayin’ stamp set. They’re actually thought bubbles but make perfect clouds. This set of dies was one of the products I demoed at my Launch Party - but I still haven’t photographed all the projects, so they will just have to wait I’m afraid. 

Stamps: See Ya Later
Cardstock: Soft Sky, Coastal Cabana, Daffodil Delight, Whisper White
Ink: Daffodil Delight
Accessories: 2 1/2” circle punch, Banner Punch, Word Bubbles dies, Soft Sky Seam-binding ribbon

Saturday, 1 February 2014

Caturday - Kitty

This afternoon is my catalogue launch party which is exciting as it will be good to catch up with some of my customers for the first time this year. I have Make & Takes and demonstrations and, of course, cake for them!


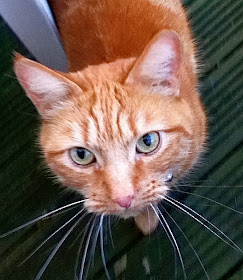
Meanwhile, it’s Caturday, so meet the unimaginatively named Kitty! She really wants a new home as her owner died and she has had to return to the cat shelter. She isn’t keen on other cats but loves people!

She looks a lot like our own cat, Cobweb, with those spectacular whiskers!


Read More » This afternoon is my catalogue launch party which is exciting as it will be good to catch up with some of my customers for the first time this year. I have Make & Takes and demonstrations and, of course, cake for them!


Meanwhile, it’s Caturday, so meet the unimaginatively named Kitty! She really wants a new home as her owner died and she has had to return to the cat shelter. She isn’t keen on other cats but loves people!

She looks a lot like our own cat, Cobweb, with those spectacular whiskers!