Thursday, 31 October 2013
Halloween goodie bags
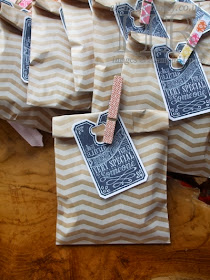
This is my one and only Halloween project
of the year – in fact I think it’s my one and only Halloween project EVER, so I
hope you like it. It’s pretty subtle and not even the slightest bit scary, I’ll admit, but small steps, eh?
They were the September gifts for my
hostess club – each bag contains some chocolate raisins, against all odds.
Reason being that I kept buying them, putting them in an attractive jar and
then they just proved too attractive to resist. Even when I’d reined myself in,
hubby kept finding them.
Finally I managed to fill these 10 bags
from the great value Goodie Gear Simply Created Kit. There are two kits
available, each containing enough for 10 projects, for just £4.50. There’s a
Real Red version – perfect for Christmas – and this Pumpkin Pie kit – perfect for
Halloween. Of course, either kit can be adapted for any other occasion, too.
I couldn’t resist adding to the kit with my
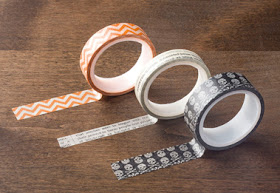
Witches’ Brew Washi Tape. An odd purchase for someone who only makes one
Halloween project every 44 years but, as I showed you in this
post, the skull tape makes it perfect for teenage boy projects.
Supplies:
Witches’ Brew Designer Washi Tape, Pumpkin Pie Goodie Gear Simply Created Kit
Tuesday, 29 October 2013
Save 20% on Tag It gift packaging bundles
I know it’s only October and some people, like my good friend Amanda Volley, think it's way too early to be thinking about Christmas - but we crafters know otherwise, don’t we?
Which is why Stampin’ Up! is giving you yet another offer - and this time to help you with your Christmas preparations.
Two new bundles will help you with your Christmas packaging - and save you 20% into the bargain! Both feature the excellent Tag It Bundle (above), which features tags, twine and stamps for making quick and easy gift tags. Then you have a choice of two box sizes:
Holiday Tag It Extra Large Box Bundle - 135812 - £16.95
Read More »
I know it’s only October and some people, like my good friend Amanda Volley, think it's way too early to be thinking about Christmas - but we crafters know otherwise, don’t we?Which is why Stampin’ Up! is giving you yet another offer - and this time to help you with your Christmas preparations.
Two new bundles will help you with your Christmas packaging - and save you 20% into the bargain! Both feature the excellent Tag It Bundle (above), which features tags, twine and stamps for making quick and easy gift tags. Then you have a choice of two box sizes:
Extra Large box decorated with the products in the bundle |
Holiday Tag It Extra Large Box Bundle - 135812 - £16.95
- Stamp a Tag Kit
- Extra Large Gift Boxes (3)
- Cherry Cobbler 1" Stitched Edge Grosgrain Ribbon (9.1m)
Decorative box features an acetate window |
Holiday Tag It Decorative Box Bundle - 135811 - £17.95
- Stamp a Tag Kit
- Decorative Window Gift Boxes (6)
- Cherry Cobbler 1" Stitched Edge Grosgrain Ribbon (9.1m)
Sound good? This offer is available from today until the end of November. Find out more by clicking the image at the top of the page or drop me a line!
Which is why Stampin’ Up! is giving you yet another offer - and this time to help you with your Christmas preparations.
Two new bundles will help you with your Christmas packaging - and save you 20% into the bargain! Both feature the excellent Tag It Bundle (above), which features tags, twine and stamps for making quick and easy gift tags. Then you have a choice of two box sizes:
Extra Large box decorated with the products in the bundle |
Holiday Tag It Extra Large Box Bundle - 135812 - £16.95
- Stamp a Tag Kit
- Extra Large Gift Boxes (3)
- Cherry Cobbler 1" Stitched Edge Grosgrain Ribbon (9.1m)
Decorative box features an acetate window |
Holiday Tag It Decorative Box Bundle - 135811 - £17.95
- Stamp a Tag Kit
- Decorative Window Gift Boxes (6)
- Cherry Cobbler 1" Stitched Edge Grosgrain Ribbon (9.1m)
Sound good? This offer is available from today until the end of November. Find out more by clicking the image at the top of the page or drop me a line!
Sunday, 27 October 2013
New product: Thinlits card dies
I have two brand new and very exciting
products to show you – and they’re available now! They are Thinlits Card Dies
and they make creating flip cards an absolute breeze.
Circle Card Thinlits Dies |
Label Card Thinlits Dies |
To use them, all you have to do is lay the
largest die on half a sheet of cardstock and run it through your Big Shot. Fold
along the scorelines, concertina-style, and you have the basis of your flip
card. Then you can decorate it as you wish, using the accompanying dies or
whatever you have to hand.
The finished card is US-sizing, but this is
not an issue, as you have several options, including:
- Use our standard C6 envelopes and live with the fact that they
are a little long. The card will still fit.
- Buy the Medium Envelopes (page 162), available in Clear or
Crumb Cake. These are sized perfectly.
- Watch this space for another fab new product!
Of course, I’ve hinted at these fab
products before, by showing you one of the cards we made at my Epic
Day of Crafting. Here’s the inside of the one pictured at the top of the page, which I made for my downline Donna’s
birthday.
For more about the Thinlits, please click here.
Stamps: Flower
Shop, Remembering Your Birthday
Cardstock:
Coastal Cabana, Whisper White, Rich Razzleberry
Ink: Rich
Razzleberry, Melon Mambo, Coastal Cabana
Accessories:
Label Card Thinlits, Chevron Embossing Folder, Pansy Punch, Bird Punch, Itty
Bitty Punches
Saturday, 26 October 2013
Caturday: Albie, lost and found
Here’s little Albie, who had a Big Adventure when he went missing from his home in Elvaston yesterday, leaving his owner - fellow craft blogger Samantha Schofield - frantic with worry, especially as there was a reported sighting in Borrowash... quite a step for a small feline.
Happily, after a search of the local area, he was found taking in the grounds of Elvaston Castle. Clearly a cat with a taste for culture... or delusions of grandeur!
Thursday, 24 October 2013
Epic Day woodmount case of cards
Today’s project was the final workshop of
the day at my Epic Day of Crafting – this box of cards. It’s made from one of
the wood-mount cases, which you can buy empty, in packs of four. It’s a very
cool idea, as there are loads of things you can do with them. If you’re the
sort of person who likes everything matchy-matchy, you can repackage your old
wood-mount stamps in them, so that all the boxes are the same size. You can
also use them to store other supplies, such as markers, reinkers, button boxes
etc.
Or, best of all, you can alter them to make
really cool gifts.
Covering the box is the easy part as it
just slides in. Then, inside you can put whatever you like – in our case,
cards, gift tags and a decorated pen.
Coincidentally, two of the stamp sets we
used for this project are currently available at 25% off! Check out the rest of
the list by clicking the link at the top of the page.
Stamps: Off
the Grid, Itty Bitty Banners, Happy Day
Cardstock:
Crumb Cake, Whisper White
Paper: Epic
Day
Ink: Basic
Gray, Crumb Cake
Accessories:
White Baker’s Twine, Bitty Butterfly Punch, Epic Day Washi Tape, Basic
Rhinestones
Wednesday, 23 October 2013
Epic Day envelope album
Today is my downline Donna’s birthday but I
can’t show you her card, because I promised to show you the envelope album from
my Epic Day of Crafting – and here it is.
I’ve shown this fab project to lots of
people – many of whom have assumed that you can buy these books from Stampin’
Up!® But no, it’s made entirely from scratch. The covers are made from
chipboard covered in Designer Series Paper, and the pages are made from
envelopes, joined together and decorated. It’s closed together with very slim magnets. It’s very
ingenious.
The design is adapted from one I made on
Monica Gale’s Paperie Treat and she kindly gave me permission to use it at my
workshop. Everyone loved it! And I loved how some people used different papers from the pack to create a totally different look to the project.
Stamps: Off
the Grid, Morning Post Alphabet, various others as required
Cardstock:
Crumb Cake, Very Vanilla, Gumball Green, Calypso Coral, Early Espresso, Vellum
Paper: Epic
Day
Ink: Basic
Gray, Crumb Cake, Early Espresso
Accessories:
Autumn Leaves die, Polka Dots embossing folder, Woodgrain embossing folder, Naturals buttons, Linen Thread, Cute
Clips, Crochet Trim, border punches, Apothecary Accents framelits
Meanwhile, happy birthday, Donna!
Tuesday, 22 October 2013
25 stamp sets at 25% off!
Whoohoo! Let’s get this party started!
As many of you will know, Stampin’ Up!®
celebrates its 25th anniversary this year – and we’ve been enjoying
a year of special offers and surprises.
The actual date is this week – the 25th
to be precise – so, to celebrate, between now and 28th October, you can buy 25 stamp sets at 25% off! That’s
a pretty impressive saving, don’t you think?!
I’m going to have a proper look myself now –
as I’m sure there will be something I *ahem* need!
Please get in touch to place an order!
Sunday, 20 October 2013
Epic Day of crafting - washi tape and clay workshop
Saturday was my Epic Day of Crafting, a much-anticipated all-day event where we crammed in three workshops. They were:
- Washi tape and clay
- Envelope album
- Notecards in box
All of the projects were colour
co-ordinated, to fit in with the Epic Day suite of products. It was great to
hear people oohing and aahing as they opened their goodie bags to find half a
pack of Epic Day DSP, a full pack of Epic Day washi tape and – most exciting of
all – a set of clay moulds. These proved invaluable as getting the clay to set
after we’d added quite a bit of ink proved tricky.
We began the day with our clay products, to
allow maximum drying time. Everyone made something along the lines of this
project – it’s simply a circle of Simply Pressed Clay, stamped. Guests were
given a magnet for the back or the option of making a hole for some ribbon to
make a hanging ornament like this one.
Some tips if you wish to have a go at
something like this:
- The ink “bleeds” slightly when you stamp into clay. For this
reason, we stamped the tiny uninked flowers first, then left the clay to
dry for a while. After about 15 mins or so, we stamped the coloured
images.
- If you wish to pierce a hole, just use the end of a straw.
- If you wish to add a magnet, make sure the clay is completely dry (overnight is best) and then attach with Crystal Effects or hot glue. Don’t even think about using anything less industrial!
Next we coloured some clay to make buttons
and flowers. The flowers were supposed to be for the card above, but I realised after
I’d made it that it used no washi tape. Oops. In the event, I decided that it
would be best if everyone took this card home to complete later, as time was
marching on.
The buttons were for use on two projects.
The first was this glass votive for a tealight. I don’t think there would be a
problem with heat on the glass/washi tape but if you’re unsure, you could
always use a battery tealight.
You can buy cheap glass votives from places
like Wilko or Poundstretcher – but why do that when you have a ton of these,
dragged back from France where they were sold filled with delicious yoghurt?
The second button project was the flip
card shown at the top of this post. The inside of the card is shown, right. It was made using new dies which will be available from tomorrow. A bonus
project at the end of the day was a matching envelope, made using a fab new
product which will be available from Tuesday.
Stamps: Off
the Grid, Summer Silhouettes, Wetlands, Happy Day
Cardstock:
Crumb Cake, Very Vanilla, Gumball Green, Calypso Coral, Vellum
Paper: Epic
Day
Ink: Basic
Gray
Accessories:
Autumn Leaves die, Polka Dots embossing folder, Thinlits Label Card die, Simply
Pressed Clay, Calypso Coral Reinker, Daffodil Delight Reinker, Epic Day Washi
Tape, Cute Clips, Linen Thread
That’s enough for one post - next time I’ll
show you our envelope album.
Saturday, 19 October 2013
Caturday - Benson
Meet Benson. He lives with the cat shelter's owner - one of many, as I'm sure you'll appreciate! He just turned up one day and never went away again. A lovely cat - he's sort of peaches and cream, most unusual.
Friday, 18 October 2013
Clean and Simple (CAS) Calm Christmas card
This is a nice
simple card which would be easy to mass-produce for Christmas. You could colour
the bird with markers but that’s not ideal for such a large area, so I inked
the dove with a Coastal Cabana ink pad, then cleaned off the ink form the leaf
with a cotton bud, before reinking it with an Old Olive marker. If you were in
a hurry, you could simplify matters by simply stamping it all in one colour, of
course.
It’s my Epic Day
of Crafting tomorrow and I’m very excited. Am going to pack my bags today and
keep my fingers tightly crossed that I don’t forget something (there’s a first
time for everything). I have some great projects planned and some fantastic
goodies for the ladies who are attending so I hope they enjoy it!
Stamps: Calm Christmas
Cardstock: Cherry Cobbler, Old Olive, Whisper White
Ink: Coastal Cabana, Cherry Cobbler, Old Olive
Accessories: Candy Dots – Brights, Corner Rounder
Wednesday, 16 October 2013
Santa's List with chevrons
Have you planned
your Christmas cards yet? If not, I can highly recommend Santa’s List. It’s
proving a very popular stamp set among my customers, who love the fact that you
can stamp him without having to colour him in. At least, that’s what I love
about him!
Here’s an early
card I made with the set, before I mastered the art of not getting the edges of
the rubber inked, too! But, as I tell my customers, we like to build in these little imperfections so that the recipient knows for sure that the card didn't come from a shop.
Love this colour combo – and I love him stamped in
Cherry Cobbler onto Crumb Cake. A classic Christmas combo.
And that’s enough
alliteration (albeit unintentional) for one morning, here’s the recipe:
Stamps: Santa’s List, Chalk Talk
Cardstock: Crumb Cake, Early Espresso, Cherry
Cobbler, Whisper White
Paper: Season of Style
Ink: Cherry Cobbler
Accessories: Chevron Embossing Folder, 1 3/8” circle
punch, Scallop circle punch
Monday, 14 October 2013
Kraft box with Season of Style washi tape
I love these Kraft
boxes, because they’re a really cool size, shape and colour – and they’re so
cheap! They’re only £2.75 for four, so it’s really not worth going to the
bother of trying to make them at that price.
For the Creative
Tour, I wanted to jazz one up with washi tape and decided to do things a little
differently. I wanted to punch holes in the box and have the washi tape showing
through. This was no mean feat because, as you know, punches don’t have a
particularly long reach. So I dismantled the box and punched in as far as I
could. There was only one section where I couldn’t manage it – on all other
sides, I punched two holes.
Next I made panels
for inside the box and put strips of washi tape on them, to show through the
holes.
The tag is made
using the Chalk Talk framelits and the bow is that lovely new Cherry Cobbler
ribbon from the Autum/Winter catalogue. A few rhinestones added a bit of
Christmas bling.
Stamps: Chalk Talk
Cardstock: Very Vanilla, Sahara Sand
Ink: Cherry Cobbler
Accessories: Chalk Talk Framelits, Kraft Gift Boxes,
Season of Style Washi Tape, Basic Rhinestones, various circle punches, Cherry
Cobbler ribbon
Saturday, 12 October 2013
Caturday: Dennis and Twinks
Remember Dennis? Shy, scared Dennis? He came to the shelter after being found injured, presumed hit by a car. The shelter owner believes he was feral. He's gradually coming round to human contact and now loves a tummy rub. But there's something he loves even more... Twinks.
Yes, crazy, hyperactive Twinks, who dangles from roofs and chases anyone and anything, has formed a very special bond with Dennis, and they sneak off to quiet corners whenever they can.
Here they are in the "Lindee-Lou", a two-storey cat house sometimes used as an isolation unit (hence, the dark, fuzzy picture) They've found the heated blanket and they're not sharing with anyone else - they just want to be left alone.
For more pictures of their beautiful friendship, please visit the Woodland Nook blog.
Thursday, 10 October 2013
Season of Style washi tape Christmas card
Another of my Creative Tour projects
was this card. I made the trees using the Perfect Pennants
die. One was embossed using the Fancy Fan embossing folder – the other was
Whisper White covered in washi tape.
Stamps:
Greetings of the Season
Cardstock:
Crumb Cake, Cherry Cobbler (textured), Whisper White, Early Espresso Core’dinations
Ink: Black
Stazon
Accessories:
Perfect Pennants Die, Season of Style washi tape, Fancy Fan embossing folder,
Brights candy dots, Expressions Thinlits
Told you I’d bought a lot of pegs! Here are
two more, decorated with Season of Style washi tape (it’s so easy!) and topped
with a monogram. The theory is that they will stand up and act as place cards.
They do stand up, honest – just not on this particular surface.
Stamps:
Morning Post Alphabet, Merry Little Christmas
Cardstock:
Whisper White, Old Olive
Ink: Cherry
Cobbler, Old Olive
Accessories:
Apothecary Accents dies, Season of Style Washi Tape
Wednesday, 9 October 2013
Expressions Thinlits and Washi Tape napkin holders
Staying with the clothes peg theme (well, I
did buy 50!), here’s another of my Creative Tour creations. Not sure what to
call them… I suppose they are a kind of napkin holder. They would make your
Christmas table look pretty festive anyway.
I happened to have some Ikea napkins in Old
Olive (somehow I keep being drawn to that colour, even after all these years),
so I dressed them up with a doily and a Cherry Cobbler “merry”. The pegs are
just decorated with Season of Style washi tape. Very easy to church out lots of
these!
Accessories:
Season of Style washi tape, Expressions Thinlits, Paper Doilies
Monday, 7 October 2013
Tag a Bag gift bags with Chalk Talk tag
Bit behind in posting this, but August’s
gift to my Virtual Hostess Club members was this little goodie bag, made using
the Tag a Bag gift bags from page 158.
I teamed the bags up with the oh so fab
Chalk Talk stamp set and fastened them closed using a clothes peg, decorated
with Mosaic Madness paper. A bit of a mish-mash of products, but quite cute I
thought. Inside they each had a chocolate treat and a tea bag, so they could
sit down with a cuppa and enjoy their Autumn/Winter catalogue.
Stamps:
Chalk Talk
Cardstock
Whisper White
Paper: Mosaic
Madness
Ink: Black
Stazon
Accessories:
Tag a Bag Gift Bags
Saturday, 5 October 2013
Caturday - Twinks
It’s Caturday and I’ve realised I never showed you this fab picture of Twinks having a mad moment, climbing the cat shelter roof! To give you an idea of how high that is, you can just see Pasca at the bottom left of the photo, sitting on the porch roof, which is standard doorway height.
Daughter says that Twinks is a lovely, quiet, calm young cat, but this photo and...
...this photo tell a completely different story.
I kind of want Twinks to stay at the shelter for a while. As much as I would love for her to have a home, she has forged a beautiful friendship with Dennis, the lonely boy who is still a bit scared to be loved and is not quite ready to leave the shelter. Daughter has a great photo of Twinks and Dennis curled up together, padding on each other’s tummies. Must get it from her for next week.
It’s Caturday all the time at the new Woodland Nook blog, which I seem to have taken over. Because I just don’t have enough to do, right?
Friday, 4 October 2013
Wetlands ornament - and a £25 sign-up offer
First of all, I am desperately trying to fill my Epic Day of Crafting, as unfortunately someone has had to drop out. I have three places left, so if you want to spend a fun day making beautiful things, please click the link at the top of the page.
Also, I have more information about that tempting £25 Starter Kit, but first I wanted to show you this little beauty.
It was made
under the expert tutelage of my friend/downline Kelly, with whom I spent a
lovely crafty afternoon during the summer with a couple of other friends.
We were playing
around with Wetlands (current favourite stamp set and possibly my biggest
seller so far!) and I showed her some little wooden hearts I’d purchased
recently.
I’d painted a few
of them in white undercoat and sanded them down. I’ve experimented with
stamping on them but not quite had the results I wanted yet.
Kelly to the
rescue! She pressed one half into a Pool Party ink pad and the other into a So
Saffron ink pad and smeared the ink around with kitchen roll. Next she stamped
the lovely sandpipers across the centre to create this beautiful scene.
Soon we were all
making them! And now we’re all arguing about who gets to make these as a
Convention swap or team gift! It may have been Kelly’s idea … but I bought the
hearts… LOL
Stamps: Wetlands
Ink: Pool Party, So Saffron, Black Stazon
Accessories: Pool Party Seam Binding Ribbon, Linen Thread, wooden heart (not
SU)
Now for the Starter Kit offer. Take a look at the table below to compare it with the standard Starter Kit. You’ll see that this deal is aimed at those people who are serious about starting a business, but perhaps already have quite a lot of SU supplies (*cough cough*). You can turn those hoarded supplies into business tools for just £25 when you take up this offer.
However, you don't get masses of craft supplies with this one - it’s merely a cheap way into running a business.
Check out the table to see which kit will suit you best. If you decide it's the standard Starter Kit, act fast before this offer starts, as the Standard Kit won't be available during the special offer. If you want to join during the offer, wait until Monday.
And when you decide to join my team, all you have to do is click this link. Simple as that.
First of all, I am desperately trying to fill my Epic Day of Crafting, as unfortunately someone has had to drop out. I have three places left, so if you want to spend a fun day making beautiful things, please click the link at the top of the page.
Also, I have more information about that tempting £25 Starter Kit, but first I wanted to show you this little beauty.
It was made
under the expert tutelage of my friend/downline Kelly, with whom I spent a
lovely crafty afternoon during the summer with a couple of other friends.
We were playing
around with Wetlands (current favourite stamp set and possibly my biggest
seller so far!) and I showed her some little wooden hearts I’d purchased
recently.
I’d painted a few
of them in white undercoat and sanded them down. I’ve experimented with
stamping on them but not quite had the results I wanted yet.
Kelly to the
rescue! She pressed one half into a Pool Party ink pad and the other into a So
Saffron ink pad and smeared the ink around with kitchen roll. Next she stamped
the lovely sandpipers across the centre to create this beautiful scene.
Soon we were all
making them! And now we’re all arguing about who gets to make these as a
Convention swap or team gift! It may have been Kelly’s idea … but I bought the
hearts… LOL
Stamps: Wetlands
Ink: Pool Party, So Saffron, Black Stazon
Accessories: Pool Party Seam Binding Ribbon, Linen Thread, wooden heart (not
SU)
Now for the Starter Kit offer. Take a look at the table below to compare it with the standard Starter Kit. You’ll see that this deal is aimed at those people who are serious about starting a business, but perhaps already have quite a lot of SU supplies (*cough cough*). You can turn those hoarded supplies into business tools for just £25 when you take up this offer.
However, you don't get masses of craft supplies with this one - it’s merely a cheap way into running a business.
Check out the table to see which kit will suit you best. If you decide it's the standard Starter Kit, act fast before this offer starts, as the Standard Kit won't be available during the special offer. If you want to join during the offer, wait until Monday.
And when you decide to join my team, all you have to do is click this link. Simple as that.
Thursday, 3 October 2013
Christmas note pad with Season of Style washi tape
A little notepad is handy to have in the
run-up to Christmas. I have a dedicated “Christmas book”, listing all the
people I send cards to and any presents. This little book would be ideal – it’s
just a cheap one from Wilko, with the cover cut off and replaced with this
crazy, washi-striped front!
Stamps:
Happy Day
Cardstock:
Whisper White, Red Glimmer Paoer
Ink: Old
Olive
Accessories:
Season of Style Washi Tape, Apothecary Accents Dies, Brights Candy Dots
Tuesday, 1 October 2013
Special offers for everyone!
At Stampin’ Up!® we like to look after
everyone, so October sees great offers for customers, hostesses and new
recruits.
Best of… Sale-a-Bration
Another new stamp set to celebrate our 25th
anniversary, this time featuring some of the best Sale-a-Bration images from
the past 25 years. This stamp set will be available until March 31, 2014, or
while stocks last, and is only available in clear-mount, at £13.95. A bargain,
I think you’ll agree.
Party more, get more!
Hostesses can clean up this month, with a special boost to their hostess benefits. A party of £250 or more will earn you an extra £25 of hostess benefits! So, a £250 party will get you a whopping £65 of freebies!
Sign up for £25
Yep, you read that right – you can sign up
for just £25! This is a very limited time offer, running from 7th to
21st October. Full details will be released soon but it seems this
will be a smaller Starter Kit, with business supplies, aimed at those who are
keen to start running a business, who probably already have a rather impressive
collection of supplies!
Please get in touch if you’d like more
information about any of the above!