Sunday, 30 December 2012
A sneak peek...
You’ll have to forgive me if I keep posting Christmas
projects for a while – I was so busy making before Christmas that I didn’t have
time to post them all.
But here’s one that looks backwards to Christmas while
looking forward to next year. I don’t think this was intended as a Christmas
stamp but I thought it would be perfect... until I realised it wasn’t a postbox
but a phone box. Never mind, by the time the penny had dropped, I’d already
coloured half a dozen of them in!
I sent this card to all my club members in December, as well
as to everyone else who placed an order... and some friends and relatives, too.
I did end up regretting it being such a high-maintenance card!
I began by stamping the phone box in Basic Gray and
colouring it in using blender pens and reinkers. The top card shown here isn’t
my best effort... I did get better at it the more I did! I stamped the greeting
in Cherry Cobbler and then used the splodge stamp from French Foliage to stamp
the snow in Whisper White craft ink.
Beneath the phone box I put a smear of Dazzling Details and then I sprayed the
whole lot using Champagne Mist Shimmer spray. You can’t see it here but they
really do sparkle!
Where’s the stamp from? Well you’ll just have to wait and
see. Suffice to say that you can’t put a price on it... I think you know where
I’m coming from!
Stamps: Feeling
Sentimental, Greetings of the Season, French Foliage
Cardstock: Cherry Cobbler, Sahara Sand (some were Crumb Cake)
Ink: Cherry Cobbler,
Basic Gray, Whisper White
Accessories: Dazzling
Details, Blender Pens, Champagne Mist Shimmer Paint
All products by Stampin’ Up!®
Saturday, 29 December 2012
A snowy cat for Caturday
Oops, I think that's the first time I've not posted between Caturdays but I'm sure you'll forgive me as it's Christmas! This is Shearer, who was staying at the cat shelter for a while but has now returned home. He's VERY fluffy, as you can see! He'd make a great Christmas card if he was pictured in the snow. Let's hope we get some snow soon.
Will be back soon(ish) with some crafty projects as, hard as it may be to believe, I HAVE been crafting a little in the past week!
Read More »
Oops, I think that's the first time I've not posted between Caturdays but I'm sure you'll forgive me as it's Christmas! This is Shearer, who was staying at the cat shelter for a while but has now returned home. He's VERY fluffy, as you can see! He'd make a great Christmas card if he was pictured in the snow. Let's hope we get some snow soon.Will be back soon(ish) with some crafty projects as, hard as it may be to believe, I HAVE been crafting a little in the past week!
Will be back soon(ish) with some crafty projects as, hard as it may be to believe, I HAVE been crafting a little in the past week!
Saturday, 22 December 2012
Pre-Christmas Caturday
So, were you banking on the world ending yesterday? If so, it looks like you're going to have to rush out and do your Christmas shopping now after all. Go on, hurry!
It's beginning to look a LOT like Christmas here... I have most of the presents wrapped, festive food stored in all the coldest places of the house (fridge and freezer both full!) and, a sure sign that the Christmas season has well and truly begun, the double issue of the Radio Times starts today. Looking forward to kicking things off with the Strictly final tonight!
I still have a couple of presents to make... yes MAKE, but panic ye not as they are baking projects so absolutely must be left to the last minute. Ingredients are purchased though so we are good to go.
Meanwhile it is, of course, Caturday, and daughter has surprisingly given me permission to post these pictures of her and Stella, a temporary resident at the shelter. As you can see, they formed quite a special bond!
Read More »
So, were you banking on the world ending yesterday? If so, it looks like you're going to have to rush out and do your Christmas shopping now after all. Go on, hurry!It's beginning to look a LOT like Christmas here... I have most of the presents wrapped, festive food stored in all the coldest places of the house (fridge and freezer both full!) and, a sure sign that the Christmas season has well and truly begun, the double issue of the Radio Times starts today. Looking forward to kicking things off with the Strictly final tonight!
I still have a couple of presents to make... yes MAKE, but panic ye not as they are baking projects so absolutely must be left to the last minute. Ingredients are purchased though so we are good to go.
This manoeuvre involved Stella marching up the daughter for a head rub |
That's the "concentrating face" as daughter balances camera in one hand and cat on shoulder. Stella looks happy though! |
It's beginning to look a LOT like Christmas here... I have most of the presents wrapped, festive food stored in all the coldest places of the house (fridge and freezer both full!) and, a sure sign that the Christmas season has well and truly begun, the double issue of the Radio Times starts today. Looking forward to kicking things off with the Strictly final tonight!
I still have a couple of presents to make... yes MAKE, but panic ye not as they are baking projects so absolutely must be left to the last minute. Ingredients are purchased though so we are good to go.
This manoeuvre involved Stella marching up the daughter for a head rub |
That's the "concentrating face" as daughter balances camera in one hand and cat on shoulder. Stella looks happy though! |
Thursday, 20 December 2012
Black butterfly box frame
Finally I have all my Christmas cards in the post – well,
all except one because I can’t find the lady’s address! Grrr... I know it will
turn up when it’s too late. Well it already is too late but you know what I
mean.
In case you think I’ve been doing nothing, here’s some proof
of activity; another box frame. I won’t bore you with them all as I’ve made
quite a few, but I wanted to show you another style. I did this one in the style of those beautiful but creepy
butterfly display cases which always make me wonder “if you love butterflies so
much why have you killed so many of them?” You’ll be pleased to know that no
butterflies were harmed in the making of this frame. Also, with the use of grid
paper, it’s not that difficult to get the butterflies in straight lines.
Instead of scoring them in the traditional manner, I rested each
one on a piercing mat and pressed in the centre with my bone folder – this both
scored them and made the edges rise up.
You can just see on the lower butterflies that they are
slightly sparkly. I did this using a mix of Champagne Mist Shimmer Paint and
isopropyl alcohol, spritzed onto black cardstock. It looks especially fabulous
on black.
The butterfly on the middle row is punched from Silver
Glimmer Paper for extra sparkle. Down the centre I have stuck some rhinestones,
which I coloured black with a Sharpie. These are a little precarious on the
Glimmer Paper as the glitter makes them hard to stick, so a little extra
adhesive was in order.
For the name, yes I treated myself to the alphabet dies and
I don’t regret it for one moment as they are fabulous! They are the real deal –
Bigz dies which will cut through chipboard – so I stuck the Designer Series
Paper to that useful cardstock backing you get in DSP packs before running it
through. To avoid clogging up the die with adhesive, I used Big Shot Adhesive
Sheets.
Cardstock: Basic Black, Whisper White, Brushed Silver
Paper: Brights DSP Stack, Silver Glimmer Paper
Accessories: Typeset
Alphabet Bigz dies, Elegant Butterfly punch, Champagne Mist Shimmer Paint,
Basic Rhinestones
All products by Stampin’ Up!®
Monday, 17 December 2012
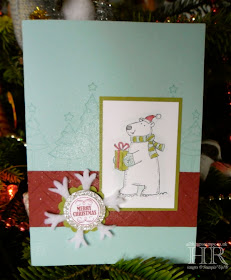
Polar Party with a touch of sparkle
If I go missing over the next few days it’s because of
computer trouble. I’m having a lot of bother with my mouse – at least, I hope
it’s the mouse! – so have ordered a new one. Basically, nothing is happening as
it should – I click and it double-clicks, I try to click and drag and
completely random things happen. Very frustrating. Hopefully it will all end
when the new mouse arrives. If not, glurk – really don’t need another major
expense just before Christmas, on top of the broken fridge-freezer, and
possible roof repairs!
Anyway, enough of the broken items in our house as I could
go on... here’s what could end up being one of the Christmas cards I’m making
this year – once I get time to assemble them, that is! All the components are
sitting in a box awaiting adhesive. This evening perhaps?
Stamps: Polar Party,
Mixed Medley
Cardstock: Pool
Party, Lucky Limeade, Cherry Cobbler, Silver Glimmer Paper, Whisper White
Ink: Basic Gray, Lucky
Limeade, Cherry Cobbler, Pool Party
Accessories: ¾”
circle punch, 1” circle punch, 1 ¼”
scallop circle punch, Snowflake Die, Chevron Embossing Folder, Blender Pens,
Smooch Spritz– Vanilla Shimmer
All products by Stampin’ Up!®
Other: White felt
If I go missing over the next few days it’s because of
computer trouble. I’m having a lot of bother with my mouse – at least, I hope
it’s the mouse! – so have ordered a new one. Basically, nothing is happening as
it should – I click and it double-clicks, I try to click and drag and
completely random things happen. Very frustrating. Hopefully it will all end
when the new mouse arrives. If not, glurk – really don’t need another major
expense just before Christmas, on top of the broken fridge-freezer, and
possible roof repairs!
Anyway, enough of the broken items in our house as I could
go on... here’s what could end up being one of the Christmas cards I’m making
this year – once I get time to assemble them, that is! All the components are
sitting in a box awaiting adhesive. This evening perhaps?
Stamps: Polar Party,
Mixed Medley
Cardstock: Pool
Party, Lucky Limeade, Cherry Cobbler, Silver Glimmer Paper, Whisper White
Ink: Basic Gray, Lucky
Limeade, Cherry Cobbler, Pool Party
Accessories: ¾”
circle punch, 1” circle punch, 1 ¼”
scallop circle punch, Snowflake Die, Chevron Embossing Folder, Blender Pens,
Smooch Spritz– Vanilla Shimmer
All products by Stampin’ Up!®
Other: White felt
Saturday, 15 December 2012
Caturday - Max
Meet Max, the extra fluffy feline belonging to my friend Amanda. She claims he has aggression issues but I didn't notice this at all when I stroked him at length last weekend. Amanda says he was just showing off for the visitor. Amanda has her own blog which she'd love you to visit - please click here.
Thursday, 13 December 2012
Christmas jelly beans with tree tag
Here are some more Christmas goodies I rustled up on Tuesday
– this time for my Virtual Hostess Club members. I like to include a little
something with every VHC order and thought it was time for something festive!
These are heavily inspired (ok, copied!) by the swaps my
friend Alison made for Convention. She cut out a tree from her cards to make a cool aperture and then used the tree to make
tags. How economical of her! This time I just made the tags but I’ve followed
her principle for another project I may get round to showing you if I can ever
get some half-decent pictures!
For this project, I filled those cute little cello bags
(SUCH a bargain – only £2.25 for 50!!!) with strawberry jelly beans (TK Maxx)
and tied the top with various natural ribbons... I actually finished off three
rolls making these. Not because I used so much ribbon, but because I was at the
end of so many.
Now the tag. The tree is cut out of Coredinations cardstock,
embossed using the Square Lattice folder, and sanded. It’s mounted onto a
scalloped circle and a larger circle to create the tag. I stuck a piece of Whisper
White cardstock onto the DSP so that it can be written on. Didn’t write on them
though – thought my club members could reuse them if I left them blank!
The final touch is a little glittery flower from Red Glimmer
Paper, topped with a pearl. Cute.
Cardstock: Early
Espresso Coredinations, Cherry Cobbler
Paper: Candlelight
Christmas, Glimmer Paper – Red
Accessories: Holiday
Framelits, Itty Bitty Punches, Basic Pearls, 2 3/8” scallop circle punch, 2 ½”
circle punch, Cherry Cobbler Baker’s Twine, Crumb Cake Seam Binding Ribbon
All products by Stampin’ Up!®
Tuesday, 11 December 2012
Butterflies box frame
To those who doubted that I could make my Christmas
presents, here’s some evidence that I’ve actually started at last! Ok, so it’s
only one but every project has to start somewhere. This is an Ikea frame (they’re
on offer at the moment so I bought loads!) a sheet of the backing from some DSP
(because I have 12x12 Whisper White on order but was impatient to get started)
and a shedload of butterflies. Nothing more, nothing less. Hard to photograph
though – see if you can spot the unfortunate reflection of a dart board!
Supplies: Box frame,
White cardstock, Big Shot, Beautiful Wings Embosslits, Beautiful Butterflies
Bigz Die, various Brights and Subtles cardstock scraps (no I’m NOT listing them
all!)
Monday, 10 December 2012
Betsy's Blossom
I’ve shown you lots of cards using the
lovely bird from Betsy’s Blossoms, so I thought it was time for one with an
actual blossom. So here’s a bright and colourful card for a grey December day.
Stamps: Betsy’s
Blossoms, Itty Bitty Banners
Cardstock: Baja
Breeze, Rich Razzleberry, Whisper White
Paper: Floral
District
Ink: Tangerine
Tango, Rich Razzleberry
Accessories: Bitty
Banners Framelits Dies, Brights Buttons, Whisper White Baker’s Twine
All products by Stampin’ Up!®
Saturday, 8 December 2012
Caturday - Sasha
Today's Caturday pin-up is Sasha, who belongs to Alison H, one of my downlines. Sasha is a rescue cat and is dressed up in her Christmas finery! Alison says she loves to sit your knee and be stroked, but just can't keep her claws to herself as she pads in ecstasy. In warmer weather, apparently she loves to lie in the sunshine, pretending to be roadkill!
Wednesday, 5 December 2012
Holiday Ornaments - simple and stepped-up
Look familiar? Yes, it’s a variation on this
card, which I’ve been using at the Make & Take at some of my pre-Christmas
workshops. I changed it up a little to use the Ornament Keepsakes bundle and
Candlelight Christmas Designer Series Paper, to tie in with last month’s offer.
However, I stuck with Gumball Green as one of the colours because I want as
many people as possible to buy the new-style ink pads before they buy as it
really is a different stamping technique. They’re absolutely brilliant for
coverage, you just need to be aware to tap lightly... or you’ll get covered in
ink!
Stamps: Ornament
Keepsakes, Greetings of the Season
Cardstock: Real Red,
Gumball Green, Whisper White
Paper: Candlelight
Christmas
Ink: Real Red,
Gumball Green
Accessories: Holiday
Ornaments framelits dies, white Baker’s Twine, 2 ½” circle punch, dotted
scallop ribbon border punch
And here’s a stepped-up version I prepared earlier. A
stepped-up card has a few more products on it and takes a little more time. It’s
not necessarily one you’d want to mass-produce.
You can just see a hint of pale GREEN glimmer paper between
the two layers of the bauble. This is a technique we learned at Convention, and
I’m not sure if I’ve mentioned it on here. But if you take some silver glimmer
paper, you can COLOUR it using markers (in an emergency, as I’m sure it’s not
good for the brush tip) or using ink refills. I used markers for this one but
achieved slightly darker results using a few (ok about 40) drops of reinker in
one of our new little spritzer bottles (p179) half-filled with isopropyl
alcohol (aka rubbing alcohol or IPA).
So, taking my ropy photography into account, which one do you prefer?
Stamps: Ornament
Keepsakes, Greetings of the Season
Cardstock: Cherry
Cobbler, Gumball Green, Whisper White
Paper: Candlelight
Christmas, Silver Glimmer Paper
Ink: Cherry Cobbler,
Gumball Green, Gumball Green marker
Accessories: Holiday
Ornaments framelits dies, Cherry Cobbler Baker’s Twine, 2 ½” circle punch,
dotted scallop ribbon border punch, 1” circle punch, paper piercing tool,
Festive piercing mat
All products by Stampin' Up!®
Monday, 3 December 2012
Stampin' Up!® paper trimmer now available
Well the title says it all but in case you need it spelling out: the new Stampin' Up!® paper trimmer is now available in Europe. The Stampin' Up!® elves have been working hard on this fab new product, to ensure that it meets customer and demonstrator recommendations. In particular, they have paid attention to all those little niggles we had about the old one we used to carry. So, with this in mind, the new trimmer features:
- Metric and imperial measurements!
- Cutting and scoring blades - dark for cutting, light for scoring
- Specially-designed handles and cutting track so that blades won't wobble: cutting and scoring lines will be straight
- Extra long track with extra space at the top and bottom so you can cut 12x12 cardstock without having to remove the extra blade
- Insertion point at the bottom of the track so blades can easily be removed
- Extended 15.9cm (6 1/4") base so you can cut most of your projects without the extender arm
- Extender arm extends cutting area to 14"
- Storage section underneath for storing bone folders, spare blades etc - with clear cover so you can see what's in it
- Non-slip feet so the trimmer won't wobble
- Measurements won't wear off!
The trimmer costs £25.95, so why not ask for one for Christmas? Drop me a line if you'd like to order one please!
Sunday, 2 December 2012
Jaffa cake goes large
It's birthday weekend in the Read household as daughter turns - gasp - 16! Makes me feel old, it does. For her cake she requested an extra large Jaffa Cake, so I paid a visit to pimpthatsnack.com - a site dedicated to showing you how to make extra large versions of your favourite snacks. Yes, really!
I baked the cake in a frying pan (handle removed) and set double-strength jelly in a smaller frying pan, although a plate would have been more appropriate. The finished product was not too bad I thought, although we could have done with shallower cake and jelly. It was VERY rich - most of it is heading to school tomorrow to entertain her friends. Oh, and it's REALLY hard to get candles into thick chocolate!
By the way, if you're visiting this blog from a country where they don't sell Jaffa Cakes, I feel for you, I really do.
On a (slightly) related note, it's also very difficult to find those little cheese savouries from parties in days gone by. These were also requested for the birthday tea and I wandered up and down the aisle in Sainsbury's for ages, struggling to see past racks and racks of "posh" crisps. I'm quite a fan of hand-baked Cheddar and caramelised shallot (cheese and onion to you and me) but daughter reckons you can't trust crisps "unless the bag is shiny" and insisted on "those little cheesy things that look like cat food". I found them eventually, as you can see!
Read More »
It's birthday weekend in the Read household as daughter turns - gasp - 16! Makes me feel old, it does. For her cake she requested an extra large Jaffa Cake, so I paid a visit to pimpthatsnack.com - a site dedicated to showing you how to make extra large versions of your favourite snacks. Yes, really!I baked the cake in a frying pan (handle removed) and set double-strength jelly in a smaller frying pan, although a plate would have been more appropriate. The finished product was not too bad I thought, although we could have done with shallower cake and jelly. It was VERY rich - most of it is heading to school tomorrow to entertain her friends. Oh, and it's REALLY hard to get candles into thick chocolate!
By the way, if you're visiting this blog from a country where they don't sell Jaffa Cakes, I feel for you, I really do.
On a (slightly) related note, it's also very difficult to find those little cheese savouries from parties in days gone by. These were also requested for the birthday tea and I wandered up and down the aisle in Sainsbury's for ages, struggling to see past racks and racks of "posh" crisps. I'm quite a fan of hand-baked Cheddar and caramelised shallot (cheese and onion to you and me) but daughter reckons you can't trust crisps "unless the bag is shiny" and insisted on "those little cheesy things that look like cat food". I found them eventually, as you can see!
I baked the cake in a frying pan (handle removed) and set double-strength jelly in a smaller frying pan, although a plate would have been more appropriate. The finished product was not too bad I thought, although we could have done with shallower cake and jelly. It was VERY rich - most of it is heading to school tomorrow to entertain her friends. Oh, and it's REALLY hard to get candles into thick chocolate!
By the way, if you're visiting this blog from a country where they don't sell Jaffa Cakes, I feel for you, I really do.
On a (slightly) related note, it's also very difficult to find those little cheese savouries from parties in days gone by. These were also requested for the birthday tea and I wandered up and down the aisle in Sainsbury's for ages, struggling to see past racks and racks of "posh" crisps. I'm quite a fan of hand-baked Cheddar and caramelised shallot (cheese and onion to you and me) but daughter reckons you can't trust crisps "unless the bag is shiny" and insisted on "those little cheesy things that look like cat food". I found them eventually, as you can see!
Saturday, 1 December 2012
A very late in the day Caturday
Sorry, only just sat down! Apologies to all those Caturday-only visitors (hello, Auntie Audrey!).
This photo is very rare indeed. This is Mr Winky and his sister, Cobweb, sharing a chair because one of them (I forget which) wanted to sit there and the other one was in the way. You can see how pleased Cobweb is about this.
And to think that when we visited them at the cat shelter all those years ago, we were told that "they love each other, we couldn't possibly split them up".
Read More »
Sorry, only just sat down! Apologies to all those Caturday-only visitors (hello, Auntie Audrey!).This photo is very rare indeed. This is Mr Winky and his sister, Cobweb, sharing a chair because one of them (I forget which) wanted to sit there and the other one was in the way. You can see how pleased Cobweb is about this.
And to think that when we visited them at the cat shelter all those years ago, we were told that "they love each other, we couldn't possibly split them up".
This photo is very rare indeed. This is Mr Winky and his sister, Cobweb, sharing a chair because one of them (I forget which) wanted to sit there and the other one was in the way. You can see how pleased Cobweb is about this.
And to think that when we visited them at the cat shelter all those years ago, we were told that "they love each other, we couldn't possibly split them up".