

Happy new month! To mark the end of possibly the longest January in history, I held a lovely relaxing craft class on Saturday. I called this my Birthday Bash event... which in retrospect was not the best name as several people have asked if I was my birthday (they didn’t send cake though, sadly).
But no, the idea was to create a set of six cards ready for all those birthdays that spring up on you in the new year.
It was also a great opportunity to use the Paper Blooms Designer Series Paper from the Sale-a-Bration brochure. Everyone received a quarter of a pack for their six projects, giving them lots of versatility and choice.

We began with this fun fold card – although I’m not sure everyone found it as fun as I did! It's made from a full sheet of A4 cardstock; the piece you cut off can be trimmed down to use as the belly band – and in fact provided the belly band for the second card, too.
Download the FREE tutorial here (opens in new window)
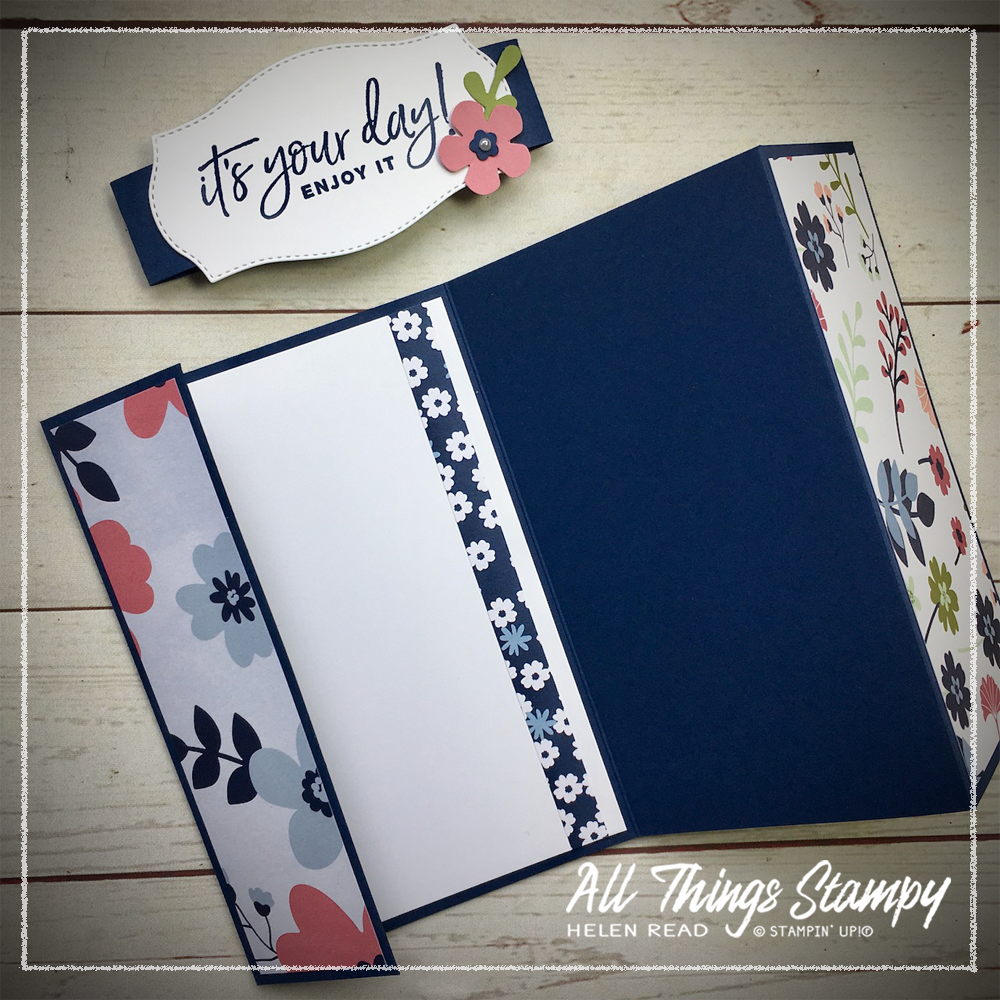
This is what the card looks like when it’s opened out. Plenty of space to write.

The second card was a simple Z-fold, where you just score the front at the halfway point and fold it back on itself. I set out to make this a masculine card but failed miserably. Never mind – we can always use more floral cards, can’t we?

Our third card utilised vellum to tone down this lovely but bold Designer Series Paper. By offsetting it a little, you can add interest. The front is decorated with flowers cut out from the Paper Blooms pack.


When using vellum, you don't want your adhesive to show, so make sure you only apply glue or tape behind your elements. I quite like the way the vellum then sits loosely on the card but if you need more security, add a glue dot and cover it with another flower or rhinestone/pearl.

Our last three cards were from a three-in-one pattern, which is fun to make and really speeds things along. Basically, you cut three pieces of DSP to the same size, then cut them up in exactly the same pattern – I used a guillotine-style cutter so did them all in one go. Then you mix up the designs to create three different cards. You don't have to follow this pattern, you can do it with vertical or horizontal strips, or use your imagination!
If you would like to follow this pattern, however...


You can earn this gorgeous Designer Series Paper FREE during Sale-a-Bration, which runs to the end of February. This is one of your choices when you place a £45 order. If you are in the UK and would like to order, please visit my store and, if you use the February host code D6PKN76U, I’ll send you a little thank you gift in March!
Does your wish list come to more than £99? Please get in touch and I will help you get more for your money and unlock discounts all year round.
NB: Please note orders are currently taking quite a bit longer than usual to arrive, due to a combination of extra paperwork required following Brexit, lower staffing levels due to the pandemic, and an influx of orders as a result of both lockdown and Sale-a-Bration. Please ask if you require more information.

No comments:
Post a Comment
Thank you so much for taking the time to comment.