Tuesday 29 June 2010

A surprising discovery


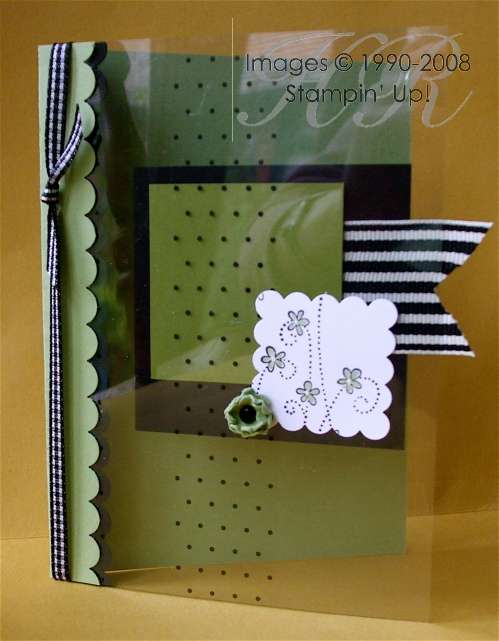
So... this is a bit of an odd one, isn’t it? My challenge was to use Old Olive (hurrah!), Certainly Celery, Basic Black with the option of Whisper White or Very Vanilla. I decided to use a window sheet from the fabulous Night & Day Designer Series Paper Pack. You get two 12x12 spotty window sheets, which is rather exciting.

Merrily creating, I was stopped in my track when I noticed I had got some adhesive on the window sheet. But undaunted, I grabbed my StazOn® remover, which was sure to shift it. It did of course... but it also removed the spots! Never mind, I thought, I will have a half spotty, half plain front... until I managed to get some stray StazOn® remover on the so-called spotty side. So I ploughed on and made this card with a spotty strip down the front. No mistakes in rubber stamping, remember!

The important thing when using Window Sheets, or acetate of any kind, is that you don’t want any adhesives to show, so only apply it where you are going to cover it up on the other side, too. So the Certainly Celery scalloped strip is stuck on the front, with a slightly larger Basic Black scalloped strip on the inside, to sandwich the window sheet and hide the glue.

The flower embellishment is a tiny version of the one made with the Scallop Circle Punch – only this time I used the Boho Blossoms punch and only three layers of cardstock. Cute!

Stamps: Simply Said
Cardstock: Certainly Celery, Old Olive, Basic Black, Whisper White
Paper: Window Sheet from Night & Day DSP
Ink: Basic Black, Certainly Celery (to colour flowers)
Accessories: Scallop Edge Punch, Scallop Square Punch, Boho Blossoms Punch, black brad, wide striped Grosgrain Ribbon - Basic Black, black gingham ribbon, blender pens, white gel pen

All products by Stampin' Up!®

Monday 28 June 2010

Shimmery bird


This was another card for the colour challenge – I’m not so keen on this, although it’s nicer in real life (honest!) because I sponged the bird with Champagne Mist shimmer paint and then spritzed it all with Champagne Mist Shimmer spray.

Stamps:  Basic Phrases
Cardstock: Basic Gray, Night of Navy,  Very Vanilla
Ink: Night of Navy
Accessories: Two-Step Bird Punch, Earth Elements and Neutrals buttons

All products by Stampin' Up!®

Saturday 26 June 2010

Nautical but nice


I do love a seaside image, so this stamp set – Seaside – is perfect for me. I made this for a colour combination challenge, which I was struggling with until I dug out this set. I had to use Night of Navy, Basic Gray and Very Vanilla... very subtle.

I stamped the image in Basic Gray and coloured using blender pens and the lid of my Night of Navy ink pad. Lots of tearing, some linen thread and I think it has quite a nautical feel.

Stamps: Seaside, Basic Phrases
Cardstock: Basic Gray, Night of Navy, Very Vanilla
Ink: Basic Gray, Night of Navy
Accessories: Linen Thread, Earth Elements and Neutrals buttons, Stamp-a-ma-jig®, blender pens

All products by Stampin' Up!®

Friday 25 June 2010

Yes, more greens...


You probably wouldn’t guess it but the brayering on this card is done with Certainly Celery (top) and Old Olive (bottom). They’ve turned out remarkably similar, haven’t they? Although the difference is a little more clear in real life.

It’s a simple idea – brayer a background, stamp in black and then colour in with white gel pen for a striking contrast.

For the rather off-the-wall ribbon treatment, I punched a hole in each corner with the Crop-A-Dile™ and threaded the ribbon through, securing at the back. I twisted and turned it, securing the odd bit here and there with a tiny dab of Snail adhesive.

Stamps: Simply Said, Tiny Tags
Cardstock: Certainly Celery, Basic Black, Whisper White
Ink: Basic Black, Certainly Celery, Old Olive
Accessories: Black gingham ribbon, Word Window Punch, White gel pen, brayer, Crop-A-Dile™

All products by Stampin' Up!®

Wednesday 23 June 2010

Window sheets - a clear choice for crafters (groan)


First things first: I thought I'd posted this card but can't find it - please tip me off if it's already been published!

And secondly, is anyone else having trouble staying logged into Blogger? It's driving me up the wall, having to log in several times a day. 

Now back to the card... you can make really special cards with Window Sheets – and these spotty sheets from the Night & Day Designer Series Paper pack are really special.

The important thing to remember is to keep the adhesives hidden – so I stuck my Basic Black layer on the front of the card, and the Barely Banana layer on the inside. I did a similar thing on the inside, with a panel on the back, so that there is somewhere to write.

I coloured this beautiful image using ink pad lids and blender pens.

Stamps: Bloomin’ With Beauty
Cardstock: Barely Banana, Basic Black, Whisper White
Paper: Night & Day
Ink: Basic Black, Barely Banana, Certainly Celery, Apricot Appeal           
Accessories: Black gingham ribbon, blender pens

All products by Stampin' Up!®

Sunday 20 June 2010

That Sweet Pea bird is back again...


I was heavily inspired for this card by one made by Canadian SU demonstrator Andrea Walford, although I changed the stamp set and the colours. I do love this bird stamp, and these colours and of course these gorgeous felt flowers. And this Designer Series Paper stack is excellent value – sheets work out at about 40.6p, which is a mega-bargain for top quality double-sided 12x12.

To make the fancy corners, take your ½” circle punch and turn it upside-down. You’ll see a cross in the middle of the metal. Push the corner of your cardstock into the centre of this cross and punch – you’ll end up with these lovely indented corners.

Stamps: My Sweet Pea, Tiny Tags
Cardstock: Pretty in Pink. Old Olive, Chocolate Chip
Paper:  Sweet Pea Paper Stack
Ink: Pretty in Pink, Chocolate Chip
Accessories: Scallop Edge Punch, White Gel Pen, Sweet Pea Stitched Felt, ½” circle punch

All products by Stampin' Up!®

Friday 18 June 2010

Going green


Lovely stamp set, lovely colours, lovely Designer Series paper – one piece from the Sweet Pea stack and one from the new Cottage Wall pack.

Stamps: Pocket Silhouettes, Tiny Tags
Cardstock: Old Olive, Whisper White
Paper: Sweet Pea Paper Stack, Cottage Wall
Ink: Certainly Celery, Old Olive
Accessories: Word Window Punch, Certainly Celery Grosgrain Ribbon

All products by Stampin' Up!®

Thursday 17 June 2010

Black and blue bird


Did a fabulous workshop on Tuesday for some lovely ladies. It went so well that they earned Queue Up (a Level 3 hostess set) and, thanks to the special offer for hostesses this month and next, £80 of free merchandise. To say they were delighted would be an understatement.

Still not had time to write the Word Window descriptions – just getting the computer to myself is a challenge at the moment.

So here’s another blast from the past, shamelessly copied from my talented downline, Kelly, who made a card similar to this for her swap when we went to the Stampin’ Up! training day together. I think she single-handedly boosted sales of this set with that one project!

The bird is stamped separately, cut and popped up. 

Stamps: Bird on a Branch, Basic Phrases
Cardstock: Basic Black, Ballet Blue, Whisper White
Ink: Ballet Blue, Basic Black
Accessories: Word Window Punch

All products by Stampin' Up! ®

Tuesday 15 June 2010

Platinum Dasher


More Word Window Punch class projects coming when I’ve had time to type up the descriptions. Meanwhile, here’s one I prepared earlier...

Not a great photo but it’s tricky with shiny things! This is what Dasher looks like when you stamp him using the Platinum Shimmer Paint, which is opaque, unlike the other two shades, which are translucent.    He actually looks a lot better in real life – less patchy. All you do is pick up the paint on a sponge dauber from the lid of the paint and apply to the stamp. It goes a remarkably long way.

Stamps: Dasher
Cardstock: Whisper White, Real Red, Basic Black
Accessories: Satin ribbon – Real Red, Platinum Shimmer Paint, sponge dauber

All products by Stampin' Up! ®

Sunday 13 June 2010

Buckle Card from Word Window Punch class

Sorry for the lack of blog action recently. I’ve not been well and it all caught up on me on Thursday so I took to my bed, had a very long nap and now I feel a lot better.

But it’s been a busy weekend, with my Word Window Punch class on Saturday morning, among many other things. On Saturday we made three projects. Each card had at least two different ways of using the Word Window Punch and, during the course of the morning, we used it to:

  1. Make a decorative tab
  2. Make a slot for a buckle card
  3. Make a long slot for a double slider card
  4. Make a tab to pull out a slider
  5. Punch out a word with another punched tab behind it
  6. Punch short tabs for shorter words
  7. Make the box fold for a pop-up card

There are loads more uses for this punch but we couldn’t fit any more in!

This is the final card we made at the class, although I’m posting this first because one of the ladies had to leave early so has all her bits of cut-up cardstock but probably won’t know what to do with them without this picture.

This is a buckle card and it is very easy to make and also a “no waste” project.

Buckle Card

1. Start with a normal card base made from a sheet of A5 cardstock scored and folded in the middle. We used Basic Black.

2. Cut off 4cm from the front. Save this strip and round the corners of one end.

3. Decorate the front of your card – which is now smaller than the back.  We used Kaleidoscope Designer Series Paper. Add a strip of Designer Paper to the black strip.

4. Now punch a Word Window in the front of your card. If you want to make sure you get it straight, you can punch out a piece of scrap paper and stick it on where you want the slot to appear. Holding the punch upside-down, you can then see exactly where to punch your window. Save the black piece you’ve punched out to decorate the front with later.

5. Take your decorated strip and measure 9cm from the rounded end. Score and fold here and apply adhesive to the shorter section (on the same side as the Designer Paper).  With the card closed, feed the rounded end of the decorated strip into the slot and stick the shorter, sticky, piece down on the inside of the card.

6. Now you can cover up the join with a piece of co-ordinating cardstock. I’ve used Summer Sun to match the Designer Series Paper.

7. Finally, embellish the card with a Word Window tab and flower at the top, and some ribbon on the strip.  I’ve just had another idea – you could punch out the flower from the Summer Sun piece to leave a black flower inside the card. That would work, too.

Stamps: Sincere Salutations
Cardstock: Summer Sun, Basic Black
Paper: Kaleidoscope
Ink: Basic Black
Accessories: Word Window Punch, Boho Blossoms Punch, Silver Brads, Whisper White Grosgrain Ribbon

All products by Stampin' Up!®

Tuesday 8 June 2010

Rock chick card with punched skull


As promised, here’s the punched skull card I made. 
This is a black card front mounted onto a white card base, but you could use a full black card base.

Please see yesterday's post for how to make the punched skull. 

I distressed the black cardstock to make it look like handmade paper. To do this, I wet it all over and rubbed away the top layer. It turned my thumb black for quite a long time! Allow to dry.

Another – arguably better – way of doing this is the faux suede technique. This gives a less rugged surface and doesn’t waste any cardstock if you’re lucky. To do this, curl your cardstock around a bone folder or scissors, just as you curl gift ribbon. If you curl it repeatedly in different directions, it should begin to separate. As soon as you can get a fingernail between the layers, slowly begin to separate them. If they don’t come apart, go back to the curling. Eventually you should be able to get the layers apart and have two pieces of faux suede cardstock!

I sprayed my black cardstock liberally with Champagne Mist shimmer paint mist (click here to see how to make it - thanks Monica!). This gives it a lovely sparkly effect.

The strip of Night & Day paper is brayered all over with Rich Razzleberry ink. You have to allow this to dry for a few minutes.

I fixed eyelets and brads along the edges of some Rich Razzleberry cardstock. I was aiming for all black but picked a white one up by mistake. I noticed in good time but popped it in anyway to see what it looked like and decided I really liked the fact that it’s different.

Next I distressed the edges of the coloured cardstock with a pair of scissors. The longer you do this, the more distressed they will be – just stop when you are happy with the results.

Using a sponge dauber, I applied Platinum Shimmer Paint to the swirl stamp from Tiny Tags and stamped on the distressed Basic Black cardstock. The hearts are stamped on scrap black cardstock and punched them out using the small heart punch.

I assembled the layers using Tombow Multi – I needed a strong adhesive to attach the black layer to the white card base as the black cardstock had gone quite wrinkly. If you use the more accepted faux suede technique you may not have this problem.

Finally, using the sponge dauber and without adding any more shimmer paint, I sponged around the edges of the entire card.

Stamps: Tiny Tags
Cardstock: Whisper White, Basic Black
Paper: Night & Day
Ink: Rich Razzleberry
Accessories: Rhinestone brads, Stampin’ Pastels, sponge daubers, Platinum shimmer paint, Champagne Mist shimmer paint, Stampin’ Write journaling pen, black pewter and white eyelets/brads, brayer, Crop-A-Dile
Punches: 1 ¾” circle, large oval, 1” circle, Boho Blossoms, Word Window, ¼” circle (optional)

All products by Stampin' Up!®

Monday 7 June 2010

Make a punched skull - tutorial


Here’s how to make a rather cool punched skull which you can use to embellish a rock chick card for a teenage girl, a fun pirate card for a younger boy or – as someone pointed out to me as it never occurred to me – a Halloween project.  This idea is totally a team effort and it all began like this...

I was stamping with one of my downlines, Kelly (who is super-talented, by the way – visit here here) and showed her how I’d brayered some Night & Day paper to change the colour. She loved the look and commented that it looked quite “rock chick”. I said we should make a punched skull and so the creating began. I will show you the completed card tomorrow. 

You will need:

The following Stampin’ Up!® punches:
1 ¾” circle punch (a smaller one might work, too)
Large oval punch
1” circle punch
Boho Blossoms punch
Word Window punch (optional)
¼” circle punch (optional)

Other supplies
Whisper White or Confetti White cardstock
Basic Black cardstock
Stampin’ Write journaling pen
Rhinestone brads (optional)
Stampin’ Pastels
Sponge dauber

First punch a 1 ¾” circle from white cardstock. Stick the circle to a piece of scrap paper and punch again to remove a crescent shape.


You should have created this shape for the head.


Punch a large oval from white cardstock.  Now carefully feed one end of this oval into your 1” circle punch, to take off one of the pointed ends, as shown.


This is what you should have now. Discard the "crescent" shape. 


Attach the head piece and the shortened oval together to create the skull shape, as shown. 

Using your Stampin’ Pastels,  sponge some grey chalk around the top of the head to reduce the starkness.


Using the Boho Blossoms punch, punch out the middle-sized flower from black cardstock.  Trim down to just one petal to create the nose. Alternatively, you could draw the nose on freehand.


Doodle the mouth and some hatchings using the Stampin’ Write Basic Black journaling pen. 

For the eyes, you can punch ¼” circles from black cardstock or use rhinestone brads. If using rhinestone brads, as shown in the first picture of this post,  punch the holes with the Crop-A-Dile™ so that they sit flat. You will also need to pop up your  skull as they are quite bulky.


If you want crossbones, you can either cut two small strips of cardstock freehand or use the Word Window punch. Punch two Word Windows and then attach them to scrap paper and punch again, to create narrower strips.


With the Boho Blossoms punch, punch the smallest flower from white cardstock four times. Trim down to two petals, creating a heart shape. Attach these to the ends of your white strips.

And you're done! Aaaaaar!


Friday 4 June 2010

Extra, extra!


I have exciting news which could lead to you getting your hands on extra freebies!

Host a workshop during June or July and, if sales reach £250, you'll get an extra £20 of free merchandise. This is on top of the already excellent hostess benefits, which just go up and up with workshop sales.

A Stampin' Up!® workshop is hassle-free and great fun. All you have to do is find a few friends, provide some drinks and nibbles (only very light nibbles - we don't want them distracted from the stamping goodies!) and I'll do the rest. I'll bring all the supplies to demonstrate a couple of projects and then everyone will have chance to make their own project. Sales only have to reach £150 for you to benefit from hostess goodies - for a £150 workshop, you'll get a Level 1 hostess set (worth £15) plus £15 of free merchandise of your choice. And the higher the workshop sales, the more freebies you get!

I have a few slots left in June and July but my diary is filling up fast, so don't delay, drop me an email if you'd like to book.

No time for a party? Don't worry - if you gather enough orders, you'll still get the freebies!

Thursday 3 June 2010

Covered notepad


I’m steadily visiting all the local Wilko branches to collect up enough of these little notepads to use in a class because they’re so cute and easy to cover using the spiral punch.  Here I’ve just added a strip of ribbon and some fab hand-stitched felt flowers.

Paper: Sweet Pea Paper Stack
Accessories: Satin ribbon – Old Olive, Sweet Pea Stitched Felt

All products by Stampin' Up! ®

Tuesday 1 June 2010

Prize time!

Thank you to everyone who placed an order during May. I gave everyone a number for each £10 they spent and then random.org (a random number generator) chose number 19.

So who is the proud holder of number 19? Drum roll please...

It's Chris H! Well done Chris, I will bring your prize to your next class.

Perfect Day

Today is the perfect day to join my team as a Stampin’ Up!® demonstrator. Why?

Because, by signing up today, not only will you have almost four months to meet your first quarterly minimum (£250 pre-VAT sales) but if you meet extra sales targets in June and July, you will earn 16 new colour ink pads – plus two sheets of A4 cardstock in each colour FREE!

Add to this our usual sales incentive programme which allows you to earn free stamps in your first six months and you could be sitting on a huge pile of free goodies by Christmas!

Don’t forget what a bargain the Starter Kit is, too – it costs just £139, postage free, and contains craft and business supplies worth £247... £216 of which are craft supplies.

Could there possibly be more good news? Yes there could! If you join Stampin’ Up! you will also have the opportunity to attend the annual two-day Convention, which this year is at the beautiful Addington Palace in Surrey in November. I’m sitting here waiting for booking to open and can’t wait!

Please click here or email me for more info on joining Stampin’ Up!®

The small print

This is my personal blog and my sole responsibility as an Independent Stampin' Up!® demonstrator. All images are © Stampin' Up!® All content including photographs, projects and text are © Helen Read, unless otherwise stated. Please feel free to copy my ideas for your personal use and inspiration - if you are a SU demonstrator you may use these ideas for your events but please give credit where it is due. Please do not use my ideas for monetary gain, competitions or publication. The images on this blog - including blog buttons - should not be copied and used elsewhere on the internet or on CDs.